<?xml version="1.0" encoding="utf-8"?>
    <feed xmlns="http://www.w3.org/2005/Atom">
        
            <title type="text">MTJO</title>


        <updated>2024-08-26T18:34:15Z</updated>

        
            <id>http://mtjo.net</id>
        
        
            <link rel="alternate" type="text/html" href="http://mtjo.net"/>
            <link rel="self" type="application/atom+xml" href="http://mtjo.net/atom.xml"/>
        
        <rights>Copyright © 2026, MTJO</rights>
        <generator uri="https://go-sonic.org/" version="v1.1.4">Sonic</generator>
        
            
                <entry>
                    <title><![CDATA[nginx 反向代理 docker hub]]></title>
                    <link rel="alternate" type="text/html"
                          href="/archives/nginx反向代理dockerhub"/>
                    <id>tag:http://mtjo.net,2024-08-27:nginx反向代理dockerhub</id>
                    <published>2024-08-27T02:27:09+08:00</published>
                    <updated>2024-08-27T02:34:15+08:00</updated>
                    <author>
                        <name>MTJO</name>
                        <uri>http://mtjo.net</uri>
                    </author>
                    <content type="html">
                        
                            <![CDATA[<p><img src="//oss.mtjo.net/img/mtjo/9a2f30aef663f4dc1e516766178d0d44.jpg" style="width:100%" /></p><p>Docker Hub 因为从所周知的原因在中国被禁用了，并且之前用到的镜像仓库也都不能用了。对于经常使用Docker的我们来说，会非常不方便。</p><p>这里提供一分我自己在用的自己解决方案：</p><p>代理：因为Docker的镜像仓库是基于Http协议的，因此我们也可以通过在海外服务器上部署反向代理设施，比如Nginx来直接代理DockerHub。</p><p>&nbsp;</p><pre><code class="language-nginx">server{    listen      80;    listen 443 ssl;    server_name aaa.bbb.com; #修改成自己域名    index index.html index.htm;    root  /data/www/blog/;    add_header 'Access-Control-Allow-Origin' '*';    add_header 'Access-Control-Allow-Headers' 'userTicket,ssotoken,token,Authorization,Content-Type,Accept,Origin,User-Agent,DNT,Cache-Control,X-Mx-ReqToken,X-Requested-With';    add_header 'Access-Control-Allow-Credentials' 'true';    add_header 'Access-Control-Allow-Methods' 'GET, POST, OPTIONS';    send_timeout 600;    client_header_buffer_size 128k;    large_client_header_buffers 4 128k;    proxy_buffer_size 64k;    proxy_buffers 8 64k;    ssl_certificate conf.d/cert/XXX.pem;   ###替换自己的证书和 key    ssl_certificate_key conf.d/cert/XXX.key; ###替换自己的证书和 key     location / {                     proxy_pass https://registry-1.docker.io;                       proxy_set_header Host registry-1.docker.io;                     proxy_set_header X-Real-IP $remote_addr;                     proxy_set_header X-Forwarded-For $proxy_add_x_forwarded_for;                     proxy_set_header X-Forwarded-Proto $scheme;                                    proxy_buffering off;                     proxy_set_header Authorization $http_authorization;                     proxy_pass_header  Authorization;                     proxy_intercept_errors on;                     recursive_error_pages on;                     error_page 301 302 307 = @handle_redirect;             }location @handle_redirect {                     resolver 1.1.1.1;                     set $saved_redirect_location '$upstream_http_location';                     proxy_pass $saved_redirect_location;             }    access_log  /data/www/logs/nginx/docker.access.log;    error_log  /data/www/logs/nginx/docker.error.log;}</code></pre><p>&nbsp;</p>]]>
                        
                    </content>
                </entry>
            
                <entry>
                    <title><![CDATA[车机辅助工具功能介绍,领克E03替换开机动画,领克开机动画,领克VIP破解,伴听VIP破解,多媒体VIP破解]]></title>
                    <link rel="alternate" type="text/html"
                          href="/archives/车机辅助工具功能介绍领克E03替换开机动画领克开机动画领克VIP破解伴听VIP破解多媒体VIP破解"/>
                    <id>tag:http://mtjo.net,2023-04-14:车机辅助工具功能介绍领克E03替换开机动画领克开机动画领克VIP破解伴听VIP破解多媒体VIP破解</id>
                    <published>2023-04-14T21:57:42+08:00</published>
                    <updated>2023-04-14T23:44:09+08:00</updated>
                    <author>
                        <name>MTJO</name>
                        <uri>http://mtjo.net</uri>
                    </author>
                    <content type="html">
                        
                            <![CDATA[<div><div><div><div><div><div><p><span style="font-size:12px"><span style="color:#000000"><span style="font-family:tahoma,arial,&quot;Hiragino Sans GB&quot;,宋体,sans-serif"><span style="background-color:#ffffff"><span style="background-color:#ffffff"><span style="font-size:48px"><span style="color:#0000ff">车机辅助工具功能介绍</span></span></span></span></span></span></span></p><p><span style="font-size:12px"><span style="color:#000000"><span style="font-family:tahoma,arial,&quot;Hiragino Sans GB&quot;,宋体,sans-serif"><span style="background-color:#ffffff"><span style="background-color:#ffffff"><span style="font-size:28px">下载地址：<a href="https://gitee.com/mtjo/carTools/releases">https://gitee.com/mtjo/carTools/releases</a></span></span></span></span></span></span></p><video autoplay="" controls="" src="http://cloud.video.taobao.com/play/u/null/p/1/e/6/t/1/405721643298.mp4" width="100%">&nbsp;</video><p><span style="font-size:12px"><span style="color:#000000"><span style="font-family:tahoma,arial,&quot;Hiragino Sans GB&quot;,宋体,sans-serif"><span style="background-color:#ffffff"><span style="background-color:#ffffff"><span style="font-size:36px">开机动画</span></span></span></span></span></span></p><p><span style="font-size:12px"><span style="color:#000000"><span style="font-family:tahoma,arial,&quot;Hiragino Sans GB&quot;,宋体,sans-serif"><span style="background-color:#ffffff"><span style="background-color:#ffffff"><img src="https://img.alicdn.com/imgextra/i2/75081313/O1CN01wefkrw1LZOrbYtqb9_!!75081313.png" style="height:auto !important" /></span></span></span></span></span></p><p><span style="font-size:12px"><span style="color:#000000"><span style="font-family:tahoma,arial,&quot;Hiragino Sans GB&quot;,宋体,sans-serif"><span style="background-color:#ffffff"><span style="background-color:#ffffff"><span style="font-size:36px">替换开机动画</span></span></span></span></span></span></p><p><span style="font-size:12px"><span style="color:#000000"><span style="font-family:tahoma,arial,&quot;Hiragino Sans GB&quot;,宋体,sans-serif"><span style="background-color:#ffffff"><span style="background-color:#ffffff"><img src="https://img.alicdn.com/imgextra/i2/75081313/O1CN01kKOY1y1LZOrVlHkyV_!!75081313.png" style="height:auto !important" /></span></span></span></span></span></p><p><span style="font-size:12px"><span style="color:#000000"><span style="font-family:tahoma,arial,&quot;Hiragino Sans GB&quot;,宋体,sans-serif"><span style="background-color:#ffffff"><span style="background-color:#ffffff"><span style="font-size:36px">系统应用管理</span></span></span></span></span></span></p><p><span style="font-size:12px"><span style="color:#000000"><span style="font-family:tahoma,arial,&quot;Hiragino Sans GB&quot;,宋体,sans-serif"><span style="background-color:#ffffff"><span style="background-color:#ffffff"><img src="https://img.alicdn.com/imgextra/i1/75081313/O1CN01QQieVm1LZOrfbZk6u_!!75081313.png" style="height:auto !important" /></span></span></span></span></span></p><p><span style="font-size:12px"><span style="color:#000000"><span style="font-family:tahoma,arial,&quot;Hiragino Sans GB&quot;,宋体,sans-serif"><span style="background-color:#ffffff"><span style="background-color:#ffffff"><span style="font-size:36px">删除系统应用</span></span></span></span></span></span></p><p><span style="font-size:12px"><span style="color:#000000"><span style="font-family:tahoma,arial,&quot;Hiragino Sans GB&quot;,宋体,sans-serif"><span style="background-color:#ffffff"><span style="background-color:#ffffff"><img src="https://img.alicdn.com/imgextra/i4/75081313/O1CN01vT28wP1LZOra1kXZe_!!75081313.png" style="height:auto !important" /></span></span></span></span></span></p><p><span style="font-size:12px"><span style="color:#000000"><span style="font-family:tahoma,arial,&quot;Hiragino Sans GB&quot;,宋体,sans-serif"><span style="background-color:#ffffff"><span style="background-color:#ffffff"><span style="font-size:36px">破解中心</span></span></span></span></span></span></p><p><span style="font-size:12px"><span style="color:#000000"><span style="font-family:tahoma,arial,&quot;Hiragino Sans GB&quot;,宋体,sans-serif"><span style="background-color:#ffffff"><span style="background-color:#ffffff"><img src="https://img.alicdn.com/imgextra/i1/75081313/O1CN01k97xSZ1LZOrWVW3lT_!!75081313.png" style="height:auto !important" /></span></span></span></span></span></p><p><span style="font-size:12px"><span style="color:#000000"><span style="font-family:tahoma,arial,&quot;Hiragino Sans GB&quot;,宋体,sans-serif"><span style="background-color:#ffffff"><span style="background-color:#ffffff">&nbsp;</span></span></span></span></span></p><p><span style="font-size:12px"><span style="color:#000000"><span style="font-family:tahoma,arial,&quot;Hiragino Sans GB&quot;,宋体,sans-serif"><span style="background-color:#ffffff"><span style="background-color:#ffffff"><span style="font-size:36px">破解伴听</span><img src="https://img.alicdn.com/imgextra/i2/75081313/O1CN0185VU681LZOraODa9s_!!75081313.png" style="height:auto !important" /></span></span></span></span></span></p><p><span style="font-size:12px"><span style="color:#000000"><span style="font-family:tahoma,arial,&quot;Hiragino Sans GB&quot;,宋体,sans-serif"><span style="background-color:#ffffff"><span style="background-color:#ffffff">&nbsp;</span></span></span></span></span></p><p><span style="font-size:12px"><span style="color:#000000"><span style="font-family:tahoma,arial,&quot;Hiragino Sans GB&quot;,宋体,sans-serif"><span style="background-color:#ffffff"><span style="background-color:#ffffff"><span style="font-size:36px">破解前vip音乐试听限制</span></span></span></span></span></span></p><p><span style="font-size:12px"><span style="color:#000000"><span style="font-family:tahoma,arial,&quot;Hiragino Sans GB&quot;,宋体,sans-serif"><span style="background-color:#ffffff"><span style="background-color:#ffffff"><img src="https://img.alicdn.com/imgextra/i1/75081313/O1CN01kVthGT1LZOrZJpE2n_!!75081313.png" style="height:auto !important" /><img src="https://img.alicdn.com/imgextra/i3/75081313/O1CN013aBrYc1LZOrVAhoo9_!!75081313.png" style="height:auto !important" /></span></span></span></span></span></p><p><span style="font-size:12px"><span style="color:#000000"><span style="font-family:tahoma,arial,&quot;Hiragino Sans GB&quot;,宋体,sans-serif"><span style="background-color:#ffffff"><span style="background-color:#ffffff">&nbsp;</span></span></span></span></span></p><p><span style="font-size:12px"><span style="color:#000000"><span style="font-family:tahoma,arial,&quot;Hiragino Sans GB&quot;,宋体,sans-serif"><span style="background-color:#ffffff"><span style="background-color:#ffffff"><span style="font-size:36px">破解后畅听全部音乐</span></span></span></span></span></span></p><p><span style="font-size:12px"><span style="color:#000000"><span style="font-family:tahoma,arial,&quot;Hiragino Sans GB&quot;,宋体,sans-serif"><span style="background-color:#ffffff"><span style="background-color:#ffffff"><img src="https://img.alicdn.com/imgextra/i3/75081313/O1CN010UVv9L1LZOrh8wP6t_!!75081313.png" style="height:auto !important" /></span></span></span></span></span></p><h3><span style="font-size:12px"><span style="color:#000000"><span style="font-family:tahoma,arial,&quot;Hiragino Sans GB&quot;,宋体,sans-serif"><span style="background-color:#ffffff"><span style="background-color:#ffffff"><span style="font-size:1.17em"><strong>&nbsp;</strong></span></span></span></span></span></span></h3><h3><span style="font-size:12px"><span style="color:#000000"><span style="font-family:tahoma,arial,&quot;Hiragino Sans GB&quot;,宋体,sans-serif"><span style="background-color:#ffffff"><span style="background-color:#ffffff"><span style="font-size:1.17em"><strong>&nbsp;</strong></span></span></span></span></span></span></h3><h3 style="text-align:center"><span style="font-size:12px"><span style="color:#000000"><span style="font-family:tahoma,arial,&quot;Hiragino Sans GB&quot;,宋体,sans-serif"><span style="background-color:#ffffff"><span style="background-color:#ffffff"><span style="font-size:1.17em"><strong><span style="font-size:36px">用户协议与免责条款</span></strong></span></span></span></span></span></span></h3><p><span style="font-size:12px"><span style="color:#000000"><span style="font-family:tahoma,arial,&quot;Hiragino Sans GB&quot;,宋体,sans-serif"><span style="background-color:#ffffff"><span style="background-color:#ffffff">&emsp;&emsp;</span></span></span></span></span></p><p><span style="font-size:12px"><span style="color:#000000"><span style="font-family:tahoma,arial,&quot;Hiragino Sans GB&quot;,宋体,sans-serif"><span style="background-color:#ffffff"><span style="background-color:#ffffff">&nbsp; &nbsp; &nbsp; &nbsp;尊敬的用户您好，感谢您使用软件！本《用户协议与免责条款》是您（下称&quot;用户&quot;）与软件作者之间在使用软件之前，以及使用本软件时签署的协议。此用户协议与免责条款软件作者提供。您若本软件，即表示您认同并接受了此协议。请注意，您的使用受制于该条款、服务、要求。请您在使用前仔细阅读此条款！<br />&nbsp;</span></span></span></span></span></p><h3><span style="font-size:12px"><span style="color:#000000"><span style="font-family:tahoma,arial,&quot;Hiragino Sans GB&quot;,宋体,sans-serif"><span style="background-color:#ffffff"><span style="background-color:#ffffff"><span style="font-size:1.17em"><strong>一、重要须知</strong></span></span></span></span></span></span></h3><p><span style="font-size:12px"><span style="color:#000000"><span style="font-family:tahoma,arial,&quot;Hiragino Sans GB&quot;,宋体,sans-serif"><span style="background-color:#ffffff"><span style="background-color:#ffffff">&emsp;&emsp;1.本软件是作者利用业余时间独立完成开发，作者目前是孤军奋战，没有加入或成立任何团队，任何团队或组织未经授权通过本软件获取利，作者有权通过法律保护自身权益。<br />&emsp;&emsp;<span style="color:red">2.本软件要购买授权才能使用，如欲购买请滑动到文末，然后使用淘宝APP识别二维码购买。</span><br />&emsp;&emsp;<span style="color:red">3.本软件仅支持16人同时使用，如启动服务提示『暂无可用端口』则需等待其他人下线后才可以启动远程服务。</span><br />&emsp;&emsp;<span style="color:red">4.本软件消耗大量服务器端口资源，闲置5分钟无人操作则自动下线释放端口资源。</span><br />&emsp;&emsp;<span style="color:red">5.本软件提供的破解服务仅能用于技术交流和学习，禁止任何人以任何形式传播破解软件，如私自传播造成的任何责任与软件作者无关。</span></span></span></span></span></span></p><h3><span style="font-size:12px"><span style="color:#000000"><span style="font-family:tahoma,arial,&quot;Hiragino Sans GB&quot;,宋体,sans-serif"><span style="background-color:#ffffff"><span style="background-color:#ffffff"><span style="font-size:1.17em"><strong>二、知识产权</strong></span></span></span></span></span></span></h3><p><span style="font-size:12px"><span style="color:#000000"><span style="font-family:tahoma,arial,&quot;Hiragino Sans GB&quot;,宋体,sans-serif"><span style="background-color:#ffffff"><span style="background-color:#ffffff">&emsp;&emsp;1.作者享有软件的全部知识产权。受中国法律的保护。<br />&emsp;&emsp;2.用户不得对应用、软件等产品进行反向工程、反向汇编、反向编译等。<br />&emsp;&emsp;3.用户只能在本《用户协议》以及相应的授权许可协议授权的范围内使作者的软件知识产权，未经授权超范围使用的，构成对作者的侵权，作者有权有权追究其法律责任。<br />&emsp;&emsp;4.任何单位或个人认为通过本软件提供服务，应该及时向软件作者提出书面申请，未经授权使用，作者有权有权追究其法律责任。<br />&nbsp;</span></span></span></span></span></p><h3><span style="font-size:12px"><span style="color:#000000"><span style="font-family:tahoma,arial,&quot;Hiragino Sans GB&quot;,宋体,sans-serif"><span style="background-color:#ffffff"><span style="background-color:#ffffff"><span style="font-size:1.17em"><strong>三、免责声明</strong></span></span></span></span></span></span></h3><p><span style="font-size:12px"><span style="color:#000000"><span style="font-family:tahoma,arial,&quot;Hiragino Sans GB&quot;,宋体,sans-serif"><span style="background-color:#ffffff"><span style="background-color:#ffffff">&emsp;&emsp;1. 本软件仅在作者的硬件上经过详细的测试，不能保证与所有的软硬件系统完全兼容，不能保证本软件完全没有错误。如果出现不兼容及软件错误的情况，用户可以提issuse将情况报告作者，获得技术支持。如果无法解决兼容性问题，用户可以删除本软件。<br />&emsp;&emsp;2. 使用本软件产品风险由用户自行承担，在适用法律允许的最大范围内，对因使用或不能使用本软件所产生的损害及风险，包括但不限于直接或间接的个人损害、商业赢利的丧失、贸易中断、商业信息的丢失或任何其它经济损失，作者不承担任何责任。<br />&emsp;&emsp;3. 对于因电信系统或互联网网络故障、计算机故障或病毒、信息损坏或丢失、计算机系统问题或其它任何不可抗力原因而产生损失，作者不承担任何责任。<br />&emsp;&emsp;4. 用户违反本协议规定，对作者权益造成损害的。作者有权采取包括但不限于中断使用许可、停止提供服务、限制使用、法律追究等措施。<br />&emsp;&emsp;5. 作者有权根据有关法律、法规的变化以及市场的调整等修改本协议。修改后的协议会随附于新版本软件。当发生有关争议时，以最新的协议文本为准。如果不同意改动的内容，用户可以自行删除本软件。如果用户继续使用本软件，则视为您接受本协议的变动。<br />&emsp;&emsp;6. 本协议的一切解释权与修改权归作者。<br />&nbsp;</span></span></span></span></span></p><p><span style="font-size:12px"><span style="color:#000000"><span style="font-family:tahoma,arial,&quot;Hiragino Sans GB&quot;,宋体,sans-serif"><span style="background-color:#ffffff"><span style="background-color:#ffffff">&nbsp;</span></span></span></span></span></p><p><span style="font-size:12px"><span style="color:#000000"><span style="font-family:tahoma,arial,&quot;Hiragino Sans GB&quot;,宋体,sans-serif"><span style="background-color:#ffffff"><span style="background-color:#ffffff">&nbsp;</span></span></span></span></span></p></div><div><span style="font-size:12px"><span style="color:#000000"><span style="font-family:tahoma,arial,&quot;Hiragino Sans GB&quot;,宋体,sans-serif"><span style="background-color:#ffffff"><span style="background-color:#ffffff"><img src="https://img.alicdn.com/imgextra/i4/75081313/O1CN01EgJpU31LZOndUmUJq_!!75081313.png" style="height:228.629px; width:750px" /></span></span></span></span></span></div></div></div></div></div><div>&nbsp;</div></div><div style="text-align:start">&nbsp;</div>]]>
                        
                    </content>
                </entry>
            
                <entry>
                    <title><![CDATA[再给领克旧车机一次机会——雷达触发360全景、转向灯触发360全景、汽车事件联动车机、超速提示。。。一样都不能少]]></title>
                    <link rel="alternate" type="text/html"
                          href="/archives/再给领克旧车机一次机会雷达触发360全景转向灯触发360全景汽车事件联动车机超速提示一样都不能少"/>
                    <id>tag:http://mtjo.net,2022-03-22:再给领克旧车机一次机会雷达触发360全景转向灯触发360全景汽车事件联动车机超速提示一样都不能少</id>
                    <published>2022-03-22T08:03:59+08:00</published>
                    <updated>2022-07-04T22:05:00+08:00</updated>
                    <author>
                        <name>MTJO</name>
                        <uri>http://mtjo.net</uri>
                    </author>
                    <content type="html">
                        
                            <![CDATA[<h2 style="font-style:italic">全部功能演示</h2><p><video controls="controls" src="//cloud.video.taobao.com/play/u/75081313/p/1/e/6/t/1/366504260671.mp4" width="90%">您的浏览器不支持 video 标签。</video></p><p>&nbsp;</p><h2 style="font-style:italic"><img src="//oss.mtjo.net/img/mtjo/c4a11d252deeff93ad6d2eaed7a55949.png" style="height:450px; width:800px" /><img src="//oss.mtjo.net/img/mtjo/d702768b1afa75bd3d9937786b14ff4d.png" style="height:450px; width:800px" /><img src="//oss.mtjo.net/img/mtjo/793fa5521142b47893d434724557809c.png" style="height:450px; width:800px" /><img src="//oss.mtjo.net/img/mtjo/6525adb3ae81c0b49f4e97007ae71527.png" style="height:450px; width:800px" /><img src="//oss.mtjo.net/img/mtjo/3e480a79d250f16c4dbbe1199aeada13.png" style="height:450px; width:800px" /><img src="//oss.mtjo.net/img/mtjo/69c32a445f2f2ab8361b1e4c48a1a8f5.png" style="height:450px; width:800px" /><img src="//oss.mtjo.net/img/mtjo/8f0614ab1f44ad33ed91fb89b8fd51ba.png" style="height:450px; width:800px" /></h2><h2 style="font-style:italic">转向灯触发360演示</h2><p><video controls="controls" src="//cloud.video.taobao.com/play/u/75081313/p/1/e/6/t/1/351615140181.mp4" width="90%">您的浏览器不支持 video 标签。</video></p><h2 style="font-style:italic">车门联动演示</h2><p><video controls="controls" src="//cloud.video.taobao.com/play/u/75081313/p/1/e/6/t/1/352149293543.mp4" width="90%">您的浏览器不支持 video 标签。</video></p><h2 style="font-style:italic"><br />更多功能请下载APP体验 <a href="https://gitee.com/mtjo/speed-event/releases/">下载地址&nbsp;</a></h2>]]>
                        
                    </content>
                </entry>
            
                <entry>
                    <title><![CDATA[GO配置国内镜像]]></title>
                    <link rel="alternate" type="text/html"
                          href="/archives/GO配置国内镜像"/>
                    <id>tag:http://mtjo.net,2022-03-10:GO配置国内镜像</id>
                    <published>2022-03-10T04:43:22+08:00</published>
                    <updated>2023-04-15T00:44:47+08:00</updated>
                    <author>
                        <name>MTJO</name>
                        <uri>http://mtjo.net</uri>
                    </author>
                    <content type="html">
                        
                            <![CDATA[<h2 style="font-style:italic">设置代理</h2><h2 style="font-style:italic">在 Linux 或 macOS 上面，需要运行下面命令（或者，可以把以下命令写到 .bashrc 或 .bash_profile 文件中）：</h2><p>&nbsp;</p><pre><code># 启用 Go Modules 功能go env -w GO111MODULE=on</code></pre><p># 配置 GOPROXY 环境变量，以下三选一</p><pre><code># 1. 官方go env -w  GOPROXY=https://goproxy.io# 2. 七牛 CDNgo env -w  GOPROXY=https://goproxy.cn# 3. 阿里云go env -w GOPROXY=https://mirrors.aliyun.com/goproxy/</code></pre><p>确认一下：</p><pre><code>go env | grep GOPROXYGOPROXY="https://goproxy.io"</code></pre><h2 style="font-style:italic">Windows</h2><p>在 Windows 上，需要运行下面命令，可以在 PowerShell 中设置：</p><pre><code># 启用 Go Modules 功能env:GO111MODULE="on"</code></pre><p># 配置 GOPROXY 环境变量，以下三选一，首推阿里云</p><pre><code># 1. 阿里云env:GOPROXY="https://mirrors.aliyun.com/goproxy/"# 2. 官方env:GOPROXY="https://goproxy.io"# 3. 七牛 CDNenv:GOPROXY="https://goproxy.cn"</code></pre><p>测试一下</p><pre><code>time go get golang.org/x/tour</code></pre><p>&nbsp;</p>]]>
                        
                    </content>
                </entry>
            
                <entry>
                    <title><![CDATA[Java 线程的创建方式有哪些？]]></title>
                    <link rel="alternate" type="text/html"
                          href="/archives/Java"/>
                    <id>tag:http://mtjo.net,2021-11-03:Java</id>
                    <published>2021-11-03T17:45:39+08:00</published>
                    <updated>2021-11-04T23:25:23+08:00</updated>
                    <author>
                        <name>MTJO</name>
                        <uri>http://mtjo.net</uri>
                    </author>
                    <content type="html">
                        
                            <![CDATA[<h1 id="java-%E7%BA%BF%E7%A8%8B%E7%9A%84%E5%88%9B%E5%BB%BA%E6%96%B9%E5%BC%8F%E6%9C%89%E5%93%AA%E4%BA%9B%EF%BC%9F" tabindex="-1">Java  线程的创建方式有哪些？</h1><ol><li>继承Thread类实现</li><li>实现Runnable接口方式</li><li>实现Callable接口方式</li></ol><p><strong>其中前两种比较常用。但是，需要有返回值需要实现Callable接口。</strong></p><h3 id="1.%E7%BB%A7%E6%89%BFthread%E7%B1%BB%E5%AE%9E%E7%8E%B0" tabindex="-1">1.继承Thread类实现</h3><pre><code class="language-">/**  * 继承Thread类，并重写run方法  */ public class MyThread extends Thread {     @Override     public void run() {         super.run();         System.out.println(&quot;MyThread...&quot;);    } } </code></pre><p>调用:</p><pre><code class="language-">MyThread thread = new MyThread();thread.start();</code></pre><p><strong>注意</strong></p><ul><li>调用start方法并不意味立刻执行run方法，只是使该线程处于可运行状态，具体什么时候执行，由系统来决定。</li><li>java不支持多继承，这种方式有继承限制。</li></ul><h3 id="2.%E5%AE%9E%E7%8E%B0runnable%E6%8E%A5%E5%8F%A3%E6%96%B9%E5%BC%8F" tabindex="-1">2.实现Runnable接口方式</h3><pre><code class="language-"> /**  * 实现Runnable接口，并重写run方法  */ public class MyRunnable implements Runnable{      @Override     public void run() {         System.out.println(&quot;MyRunnable...&quot;);    } } </code></pre><p>调用:</p><pre><code class="language-">   MyRunnable runnable=new MyRunnable();   Thread thread=new Thread(runnable);   thread.start();</code></pre><p><strong>注意</strong><br />限制较小，推荐用这个方式。</p><h3 id="3.%E5%AE%9E%E7%8E%B0callable%E6%8E%A5%E5%8F%A3%E6%96%B9%E5%BC%8F" tabindex="-1">3.实现Callable接口方式</h3><pre><code class="language-">/**  * 实现Callable接口，并重写call方法  */ public class MyCallable implements Callable&lt;String&gt;{     @Override     public String call() throws Exception {         return &quot;MyCallable...&quot;;    } } </code></pre><p>调用:</p><pre><code class="language-">//创建和调用 MyCallable callable=new MyCallable(); ExecutorService eService=Executors.newSingleThreadExecutor(); Future&lt;String&gt; future=eService.submit(callable);      //获取返回结果 try {    String result=future.get();    System.out.println(result); } catch (Exception e) {    e.printStackTrace(); }</code></pre><p><strong>注意</strong></p><ul><li>callable需要配合线程池使用</li><li>callable比runnable功能复杂一些</li><li>Callable的call方法有返回值并且可以抛异常，而Runnable的run方法就没有返回值也没有抛异常，也就是可以知道执行线程的时候出了什么错误。</li><li>Callable运行后可以拿到一个Future对象，这个对象表示异步计算结果，可以从通过Future的get方法获取到call方法返回的结果。但要注意调用Future的get方法时，当前线程会阻塞，直到call方法返回结果。</li></ul>]]>
                        
                    </content>
                </entry>
            
                <entry>
                    <title><![CDATA[IOS、Mac中国法定节假日]]></title>
                    <link rel="alternate" type="text/html"
                          href="/archives/IOSMac中国法定节假日"/>
                    <id>tag:http://mtjo.net,2021-09-26:IOSMac中国法定节假日</id>
                    <published>2021-09-26T23:28:34+08:00</published>
                    <updated>2021-11-26T01:45:50+08:00</updated>
                    <author>
                        <name>MTJO</name>
                        <uri>http://mtjo.net</uri>
                    </author>
                    <content type="html">
                        
                            <![CDATA[<h2>Mac和iPhone中的日历和提醒事项APP功能强大，但是对内节假日和国务院办公厅发布的《节假日安排通知》支持不友好。</h2><p><strong>网上也有提供一些个人分享的订阅地址，但问题很多:</strong></p><ul><li><strong>有的更新不及时</strong></li><li><strong>有的自己手动编辑存在错漏</strong></li><li><strong>有的还因为分享人取消失效了</strong></li></ul><p><big>作为开发人员不能忍，自己写个程序来爬国务院办公厅的《节假日安排通知》来生成ics订阅文件</big></p><p>奉上订阅地址：</p><pre><code class="language-bash">https://mtjo.net/icalendar/holidays.ics #中国法定节假日https://mtjo.net/icalendar/holidays.json #中国法定节假日json格式https://calendars.icloud.com/holidays/cn_zh.ics #中国节假日（苹果官方提供，包含24节气）</code></pre><h3><a name="MacOS / IPHONE 点击当前地址订阅"></a><a href="webcal://mtjo.net/icalendar/holidays.ics">MacOS / IPHONE 点击当前地址订阅</a></h3><h3><a name="iphone 原相机扫码订阅"></a>iphone 原相机扫码订阅</h3><p><img alt="iphone 原相机扫码订阅" src="https://oss.mtjo.net/img/mtjo/c0100a66f43fd5e79a5bf96d6f0ab517.png" /></p><ul><li><big>程序会在10、11、12月份每天查询务院办公厅开放的接口看是否有更新</big></li><li><big>订阅地址默认返回最近3年的法定节假日信息，如果需要更多或者更少可通过num参数设置。示例：<a href="https://mtjo.net/icalendar/holidays.ics?num=10">https://mtjo.net/icalendar/holidays.ics?num=10</a></big></li><li><big>示例：<a href="https://mtjo.net/icalendar/holidays.json?num=10">https://mtjo.net/icalendar/holidays.json?num=10</a></big></li></ul><h2><a name="简单说一下原理:"></a>简单说一下原理:</h2><p><big>每年11、12月分通过国务院办公厅开放的接口查询是否有更新：</big></p><p><img alt="" src="https://oss.mtjo.net/img/mtjo/f8f27076f1ca4f4c060bbce3fb4ff9d1.png" /></p><p><img alt="" src="https://oss.mtjo.net/img/mtjo/ddc3fe0c9468f19a1f0db1164ac47722.png" /></p><h2><a name="查看数量是否有变化："></a>查看数量是否有变化：</h2><p><img alt="" src="https://oss.mtjo.net/img/mtjo/d351a0c336123c19b23d5a7e6c184d9f.png" /></p><h2><a name=" "></a>&nbsp;</h2><h2><a name="有更新则执行爬取内容解析成ics"></a>有更新则执行爬取内容解析成ics</h2><p><img alt="" src="https://oss.mtjo.net/img/mtjo/8fd77ba1d6e17770d89dc6ce8e8acd43.png" /></p><p><img alt="" src="https://oss.mtjo.net/img/mtjo/79e6e1178dfab5a6a340ec8bc1ab0fe3.png" /></p>]]>
                        
                    </content>
                </entry>
            
                <entry>
                    <title><![CDATA[卸载阿里云监控软件方法]]></title>
                    <link rel="alternate" type="text/html"
                          href="/archives/1782199226432"/>
                    <id>tag:http://mtjo.net,2021-09-10:1782199226432</id>
                    <published>2021-09-10T03:48:20+08:00</published>
                    <updated>2021-10-22T01:43:34+08:00</updated>
                    <author>
                        <name>MTJO</name>
                        <uri>http://mtjo.net</uri>
                    </author>
                    <content type="html">
                        
                            <![CDATA[<h2 id="%E5%8D%B8%E8%BD%BDaliyundun" tabindex="-1">卸载AliYunDun</h2><pre><code class="language-bash">    wget http://update.aegis.aliyun.com/download/uninstall.sh    chmod +x uninstall.sh    ./uninstall.sh    wget http://update.aegis.aliyun.com/download/quartz_uninstall.sh    chmod +x quartz_uninstall.sh    ./quartz_uninstall.sh</code></pre><h2 id="%E5%88%A0%E9%99%A4aliyundun%E6%AE%8B%E7%95%99" tabindex="-1">删除AliYunDun残留</h2><pre><code class="language-bash">    pkill aliyun-service    rm -fr /etc/init.d/agentwatch /usr/sbin/aliyun-service    rm -rf /usr/local/aegis*</code></pre><h2 id="%E5%88%A0%E9%99%A4aliyundun%E6%AE%8B%E7%95%99iptables" tabindex="-1">删除AliYunDun残留iptables</h2><pre><code class="language-bash">    iptables -I INPUT -s 140.205.201.0/28 -j DROP    iptables -I INPUT -s 140.205.201.16/29 -j DROP    iptables -I INPUT -s 140.205.201.32/28 -j DROP    iptables -I INPUT -s 140.205.225.192/29 -j DROP    iptables -I INPUT -s 140.205.225.200/30 -j DROP    iptables -I INPUT -s 140.205.225.184/29 -j DROP    iptables -I INPUT -s 140.205.225.183/32 -j DROP    iptables -I INPUT -s 140.205.225.206/32 -j DROP    iptables -I INPUT -s 140.205.225.205/32 -j DROP    iptables -I INPUT -s 140.205.225.195/32 -j DROP    iptables -I INPUT -s 140.205.225.204/32 -j DROP</code></pre>]]>
                        
                    </content>
                </entry>
            
                <entry>
                    <title><![CDATA[iftop – 实时 Linux 网络带宽监控工具]]></title>
                    <link rel="alternate" type="text/html"
                          href="/archives/iftop实时Linux网络带宽监控工具"/>
                    <id>tag:http://mtjo.net,2021-09-09:iftop实时Linux网络带宽监控工具</id>
                    <published>2021-09-09T20:29:46+08:00</published>
                    <updated>2021-10-21T00:10:28+08:00</updated>
                    <author>
                        <name>MTJO</name>
                        <uri>http://mtjo.net</uri>
                    </author>
                    <content type="html">
                        
                            <![CDATA[<p style="text-align:left"><span style="font-size:10.5pt"><span style="font-family:DengXian"><span style="font-size:12.0pt"><span style="font-family:宋体">top</span></span><span style="font-size:12.0pt"><span style="font-family:宋体">命令相信大家都有了解,在本文中提出了另一个名为<strong>Interface TOP&nbsp;(IFTOP) 的</strong>优秀程序，<strong>它</strong>是一个基于控制台的实时网络带宽监控工具。</span></span></span></span></p><p style="text-align:left"><span style="font-size:10.5pt"><span style="font-family:DengXian"><span style="font-size:12.0pt"><span style="font-family:宋体">它将显示界面上网络活动的快速概览。Iftop可以显示平均每<strong>2</strong>、<strong>10</strong>和<strong>40</strong>秒显示实时更新的网络使用带宽列表。在这篇文章中，我们将通过Linux 中的示例了解安装以及如何使用<strong>IFTOP</strong>。</span></span></span></span></p><div><p style="text-align:left"><span style="font-size:10.5pt"><span style="font-family:DengXian"><strong><span style="font-size:19.5pt"><span style="font-family:宋体"><span style="color:#aa4b80">依赖要求：</span></span></span></strong></span></span></p></div><ul><li style="text-align:left" value="50"><span style="font-size:10.5pt"><span style="font-family:DengXian"><strong><span style="font-size:12.0pt"><span style="font-family:宋体">libpcap</span></span></strong><span style="font-size:12.0pt"><span style="font-family:宋体">：用于捕获实时网络数据的库。</span></span></span></span></li><li style="text-align:left" value="50"><span style="font-size:10.5pt"><span style="font-family:DengXian"><strong><span style="font-size:12.0pt"><span style="font-family:宋体">libncurses</span></span></strong><span style="font-size:12.0pt"><span style="font-family:宋体">：一个编程库，它提供了一个 API，用于以独立于终端的方式构建基于文本的界面。</span></span></span></span></li></ul><div><p style="text-align:left"><span style="font-size:10.5pt"><span style="font-family:DengXian"><strong><span style="font-size:22.5pt"><span style="font-family:宋体"><span style="color:#3498db">安装</span></span></span></strong><strong><span style="font-size:22.5pt"><span style="font-family:&quot;Arial&quot;,sans-serif"><span style="color:#3498db"> libpcap</span></span></span></strong><strong><span style="font-size:22.5pt"><span style="font-family:宋体"><span style="color:#3498db">、</span></span></span></strong><strong><span style="font-size:22.5pt"><span style="font-family:&quot;Arial&quot;,sans-serif"><span style="color:#3498db">libncurses</span></span></span></strong></span></span></p></div><p style="text-align:left"><span style="font-size:10.5pt"><span style="font-family:DengXian"><span style="font-size:12.0pt"><span style="font-family:宋体">使用 Linux 分发包管理器安装<strong>libpcap</strong>和<strong>libncurses</strong>库，如图所示。</span></span></span></span></p><div><pre><code class="language-bash">sudo apt install libpcap0.8 libpcap0.8-dev libncurses5 libncurses5-dev [在 Debian/Ubuntu 上]yum -y install libpcap libpcap-devel ncurses ncurses-devel [在 CentOS/RHEL 上]dnf -y install libpcap libpcap-devel ncurses ncurses-devel [在 Fedora 22+ 上]</code></pre><p><span style="font-size:10.5pt"><span style="font-family:DengXian"><strong><span style="font-size:22.5pt"><span style="font-family:宋体"><span style="color:#3498db">下载并安装</span></span></span></strong><strong><span style="font-size:22.5pt"><span style="font-family:&quot;Arial&quot;,sans-serif"><span style="color:#3498db">iftop</span></span></span></strong></span></span></p></div><p style="text-align:left"><span style="font-size:10.5pt"><span style="font-family:DengXian"><strong><span style="font-size:12.0pt"><span style="font-family:宋体">iftop</span></span></strong><span style="font-size:12.0pt"><span style="font-family:宋体">在<strong>Debian/Ubuntu</strong>&nbsp;Linux的官方软件存储库中可用，您可以使用</span></span><span style="font-size:12.0pt"><span style="font-family:宋体"><span style="color:#bb0e30">apt install</span></span></span><span style="font-size:12.0pt"><span style="font-family:宋体">安装它，如图所示。</span></span></span></span></p><div><pre><code class="language-bash">sudo apt install iftop</code></pre><p><span style="font-size:10.5pt"><span style="font-family:DengXian"><span style="font-size:12.0pt"><span style="font-family:宋体">在<strong>RHEL/CentOS 上</strong>，您需要启用</span></span><span style="font-size:12.0pt"><span style="font-family:宋体"><span style="color:#bb0e30">EPEL 存储库</span></span></span><span style="font-size:12.0pt"><span style="font-family:宋体">，然后按如下方式安装。</span></span></span></span></p></div><div><pre><code class="language-bash">yum install epel-releaseyum install iftop</code></pre><p><span style="font-size:10.5pt"><span style="font-family:DengXian"><span style="font-size:12.0pt"><span style="font-family:宋体">在<strong>Fedora</strong>发行版上，<strong>iftop</strong>也可以从默认系统存储库中使用以下命令进行安装。</span></span></span></span></p></div><div><pre><code class="language-bash">dnf install iftop</code></pre><p><span style="font-size:10.5pt"><span style="font-family:DengXian"><span style="font-size:12.0pt"><span style="font-family:宋体">其他 Linux 发行版，可以使用<span style="color:#bb0e30">wget 命令</span>下载<strong>iftop</strong>源包并从源代码编译它，如图所示。</span></span></span></span></p></div><div><pre><code class="language-bash">wget http://www.ex-parrot.com/pdw/iftop/download/iftop-0.17.tar.gztar -zxvf iftop-0.17.tar.gzcd iftop-0.17./configuremakemake install</code></pre><p><span style="font-size:10.5pt"><span style="font-family:DengXian"><strong><span style="font-size:22.5pt"><span style="font-family:&quot;Arial&quot;,sans-serif"><span style="color:#3498db">iftop</span></span></span></strong><strong><span style="font-size:22.5pt"><span style="font-family:宋体"><span style="color:#3498db">的基本用法</span></span></span></strong></span></span></p></div><p style="text-align:left"><span style="font-size:10.5pt"><span style="font-family:DengXian"><span style="font-size:12.0pt"><span style="font-family:宋体">安装完成后，转到您的控制台并运行不带任何参数的<strong>iftop</strong>命令以查看默认接口的带宽使用情况，如下面的屏幕截图所示。</span></span></span></span></p><div><pre><code class="language-bash">sudo iftop</code></pre><p><span style="font-size:10.5pt"><span style="font-family:DengXian"><strong><span style="font-size:12.0pt"><span style="font-family:宋体">iftop</span></span></strong><span style="font-size:12.0pt"><span style="font-family:宋体">命令的示例输出显示默认接口的带宽，如下所示。</span></span></span></span></p></div><p style="text-align:left">&nbsp;</p><p style="text-align:left"><img src="//oss.mtjo.net/img/mtjo/e8a0a3eceaab2de3222824fae8f816c6.png" style="width:100%" /></p><p style="text-align:left"><span style="font-size:10.5pt"><span style="font-family:DengXian"><span style="font-size:12.0pt"><span style="font-family:宋体">实时监控 Linux 网络带宽</span></span></span></span></p><div><p style="text-align:left"><span style="font-size:10.5pt"><span style="font-family:DengXian"><strong><span style="font-size:22.5pt"><span style="font-family:宋体"><span style="color:#3498db">监控</span></span></span></strong><strong><span style="font-size:22.5pt"><span style="font-family:&quot;Arial&quot;,sans-serif"><span style="color:#3498db"> Linux </span></span></span></strong><strong><span style="font-size:22.5pt"><span style="font-family:宋体"><span style="color:#3498db">网络接口</span></span></span></strong></span></span></p></div><p style="text-align:left"><span style="font-size:10.5pt"><span style="font-family:DengXian"><span style="font-size:12.0pt"><span style="font-family:宋体">首先运行<u><span style="color:#bb0e30">ifconfig </span><span style="color:#bb0e30">命令</span></u>或<u><span style="color:#bb0e30">ip </span><span style="color:#bb0e30">命令</span></u>以查找 Linux 系统上所有连接的网络接口。</span></span></span></span></p><div><pre><code class="language-bash">sudo ifconfig#或sudo ip addr show</code></pre><p><span style="font-size:10.5pt"><span style="font-family:DengXian"><span style="font-size:12.0pt"><span style="font-family:宋体">然后使用该<span style="background-color:#f4f2ff"><span style="color:#9884fc">-i</span></span>标志指定要监视的接口。例如，下面的命令用于监控测试计算机上eth0的带宽。</span></span></span></span></p></div><div><pre><code class="language-bash">sudo iftop -i eth0</code></pre><p>&nbsp;</p></div><p style="text-align:left"><img src="//oss.mtjo.net/img/mtjo/df157074a25beeb76409bf91da95dc3b.png" style="width:100%" /></p><p style="text-align:left">&nbsp;</p><p style="text-align:left"><span style="font-size:10.5pt"><span style="font-family:DengXian"><span style="font-size:12.0pt"><span style="font-family:宋体">要禁用主机名显示，请使用<span style="background-color:#f4f2ff"><span style="color:#9884fc">-n</span></span>标志。</span></span></span></span></p><div><pre><code class="language-bash">sudo iftop -n eth0</code></pre><p><span style="font-size:10.5pt"><span style="font-family:DengXian"><span style="font-size:12.0pt"><span style="font-family:宋体">要打开端口显示，请使用<span style="background-color:#f4f2ff"><span style="color:#9884fc">-P</span></span>标志。</span></span></span></span></p></div><div><pre><code class="language-bash">sudo iftop -P eth0</code></pre><p><span style="font-size:10.5pt"><span style="font-family:DengXian"><strong><span style="font-size:22.5pt"><span style="font-family:&quot;Arial&quot;,sans-serif"><span style="color:#3498db">iftop </span></span></span></strong><strong><span style="font-size:22.5pt"><span style="font-family:宋体"><span style="color:#3498db">选项和用法</span></span></span></strong></span></span></p></div><p style="text-align:left"><span style="font-size:10.5pt"><span style="font-family:DengXian"><span style="font-size:12.0pt"><span style="font-family:宋体">在运行<strong>iftop 命令</strong>，你可以用按键<span style="background-color:#f4f2ff"><span style="color:#9884fc">S</span></span>，<span style="background-color:#f4f2ff"><span style="color:#9884fc">D</span></span>查看到更信息如：<strong>来源主机</strong>，<strong>目标地址</strong>等，如果你想探索更多功能，请运行<strong>man iftop</strong>，如果想退出运行的窗口按&ldquo;<span style="background-color:#f4f2ff"><span style="color:#9884fc">q</span></span>&rdquo;即可。</span></span></span></span></p><p style="text-align:left"><span style="font-size:10.5pt"><span style="font-family:DengXian"><span style="font-size:12.0pt"><span style="font-family:宋体">附件：界面说明</span></span></span></span></p><p style="text-align:left"><img src="//oss.mtjo.net/img/mtjo/1e25ab65490126db754f6cc48a7889ee.png" style="width:100%" /></p><p style="text-align:left"><span style="font-size:10.5pt"><span style="font-family:DengXian"><span style="font-size:12.0pt"><span style="font-family:宋体">在本文中，我们展示了如何在 Linux 中安装和使用 iftop，这是一个网络接口监控工具。如果您想了解更多有关<strong>iftop 的信息，</strong>请访问</span></span><span style="font-size:12.0pt"><span style="font-family:宋体"><a href="http://www.ex-parrot.com/pdw/iftop/download/" target="_blank"><span style="color:#bb0e30">iftop </span><span style="color:#bb0e30">网站</span></a></span></span><span style="font-size:12.0pt"><span style="font-family:宋体">。有问题可以通过下面的评论框提出。</span></span></span></span></p><p style="text-align:justify">&nbsp;</p>]]>
                        
                    </content>
                </entry>
            
                <entry>
                    <title><![CDATA[免费申请和使用IntelliJ IDEA商业版License指南]]></title>
                    <link rel="alternate" type="text/html"
                          href="/archives/免费申请和使用IntelliJIDEA商业版License指南"/>
                    <id>tag:http://mtjo.net,2021-09-07:免费申请和使用IntelliJIDEA商业版License指南</id>
                    <published>2021-09-07T20:02:31+08:00</published>
                    <updated>2021-10-22T01:38:20+08:00</updated>
                    <author>
                        <name>MTJO</name>
                        <uri>http://mtjo.net</uri>
                    </author>
                    <content type="html">
                        
                            <![CDATA[<p><span style="color:#d35400"><code>JetBrains 全家桶</code></span>广受开发者喜爱，但价格十分昂贵，虽然&nbsp;<span style="color:#d35400"><code>JetBrains</code>&nbsp;</span>全家桶在某宝、甚至破解网有各种不可描述的获取方式。但总是不常规方式，且总会被<span style="color:#d35400"><code>JetBrains</code></span>封杀（除非一直用旧版），而如果存在正规、不违背规则的永久使用<span style="color:#d35400"><code>JetBrains</code></span>全家桶的福利，为什么不尝试一下呢。</p><h2 style="font-style:italic">方法一：使用<code>Community版&nbsp;</code></h2><p>&nbsp; &nbsp; 正常情况下 JetBrains 公司的每个 IDE 分为Ultimate（企业付费版本）和Community（社区免费）两个版本。</p><p><img src="//oss.mtjo.net/img/mtjo/cb91dbf411ace56a7efadcc84b335e7e.png" style="width:100%" /></p><p>下载的时候选择下载<code>Community（社区免费版）即可永久免费使用。</code></p><p>但实际开发中大多数人都是使用、或希望使用 Ultimate 版本，因为它功能全面且完善，由于黑科技盛行，现在大多数人都是使用破解版的 Ultimate 版本。虽然能用，但基本都是旧版的，而且基本一升级破解就失效，毕竟<span style="color:#d35400"><code>JetBrains&nbsp;</code></span>也不是吃素的。</p><h2 style="font-style:italic">方法二：申请开源许可证</h2><p><code>JetBrains</code>&nbsp;公司为了表达对开源项目的支持。只要你拥有一个符合条件的开源项目，你或者你的团队就可以免费使用&nbsp;<code>JetBrains</code>&nbsp;公司旗下所有的&nbsp;<code>Ultimate</code>&nbsp;版本的&nbsp;<code>IDE</code>&nbsp;开发工具，即全家桶的使用权&nbsp;<code>1</code>&nbsp;年，如果到期了还可以继续申请。</p><p>开源项目要求：</p><ul><li>你必须是项目的发起人或是活跃的&nbsp;<code>commiter</code></li><li>你的项目需要积极开发&nbsp;<code>3</code>&nbsp;个月以上</li><li>定期发布版本</li><li>符合开源的定义，不能包含有关商业性质的内容</li></ul><h2>申请方式</h2><p>通过&nbsp;<a href="https://www.jetbrains.com/shop/eform/opensource?product=ALL" target="_blank">JetBrains 官方</a>&nbsp;提供的申请链接，可以进行开源许可证的申请。按照要求填写表单并提交即可。</p><p><img src="//oss.mtjo.net/img/mtjo/1f92af80483c6f1f3f253a92c2d2b3fc.png" style="width:100%" /></p><p>&nbsp;</p><p>通过上面的申请地址，进行开源许可证的申请，按照所提到的消息填写并提交，剩下的只需要等待就可以了。我用来申请的开源项目是&nbsp;<a href="https://github.com/mtjo/MacStroke" target="_blank">MacStroke</a>&nbsp;。</p><p><img src="//oss.mtjo.net/img/mtjo/4176960c1070b21adaea7ed1ae1e7e46.png" style="width:100%" /></p><p><span style="color:#e74c3c">提交申请大约在一天之后，会收到了&nbsp;<code>JetBrains</code>&nbsp;公司工作人员发来的邮件，大概意思是已经批准了你的免费 JetBrains 开源许可的请求。有效期为一年，许可证即将到期前会有自动电子邮件提醒。如果你的项目还符合要求可以随时申请续签。</span></p><p>&nbsp;</p><p><img src="//oss.mtjo.net/img/mtjo/1037964f298ef6ab5dfec171a7e17fa1.png" style="width:100%" /></p><p>上述邮件有几处需要注意：<br />1. 附件就是License，请勿将此License用于商业开发用途；<br />2.&nbsp;这个License的有效期是1年，过期前会有邮件通知，此时如果您的开源项目依然符合申请条件，可以申请续一年；</p><p>&nbsp;</p><p>然后点击邮件中的&quot;<a href="https://account.jetbrains.com/order/assets/6i3wezaotoc19msc1cwrywqv6" target="_blank">Take me to my license(s)</a>&nbsp;&quot;这个链接，会打开如下图的页面，点击红框中的按钮，<span style="color:#e74c3c"><span style="font-size:16px">向开源项目成员发送邀请邮件</span></span>：</p><p><img src="//oss.mtjo.net/img/mtjo/e37cd285e43172b389098f98a4d9d71f.png" style="width:100%" /></p><p><span style="color:#e74c3c"><span style="font-size:16px">邀请邮件很快送达</span></span>，如下图，点击红框中的链接，去确认账号：</p><p><img src="//oss.mtjo.net/img/mtjo/8e305623bed55f4545aab703c2881737.png" style="width:100%" /></p><p>根据提示操作完成提交后会跳转以下页面：</p><p><img src="//oss.mtjo.net/img/mtjo/c86c5c3bc70450f8917f9a15adc476f3.png" style="width:100%" /></p><p>&nbsp;</p><p>点击红框中的链接即可看到生成的证书：<img src="//oss.mtjo.net/img/mtjo/3b90996269672be4a8b0685c0e802222.png" style="width:100%" /></p><p>&nbsp;</p><p>接下来就是激动人心的激活了，JetBrains 全家桶都可以用</p><p><img src="//oss.mtjo.net/img/mtjo/aeea7f0d8412bb018f5c642830025d4f.png" style="width:100%" /></p><p><img src="//oss.mtjo.net/img/mtjo/c9cdba89f7a7e59935d7419f54ef861d.png" style="width:100%" /></p>]]>
                        
                    </content>
                </entry>
            
                <entry>
                    <title><![CDATA[ssh 远程执行命令]]></title>
                    <link rel="alternate" type="text/html"
                          href="/archives/ssh远程执行命令"/>
                    <id>tag:http://mtjo.net,2021-09-04:ssh远程执行命令</id>
                    <published>2021-09-04T04:48:34+08:00</published>
                    <updated>2021-10-21T00:04:59+08:00</updated>
                    <author>
                        <name>MTJO</name>
                        <uri>http://mtjo.net</uri>
                    </author>
                    <content type="html">
                        
                            <![CDATA[<p style="text-align:left"><span style="font-size:10.5pt"><span style="background-color:white"><span style="font-family:DengXian"><span style="font-family:&quot;PingFang SC&quot;,sans-serif"><span style="color:#333333">SSH </span></span><span style="font-family:&quot;PingFang SC&quot;,sans-serif"><span style="color:#333333">是 Linux 下进行远程连接的基本工具，但是如果仅仅用它来登录那可是太浪费啦！SSH 命令可是完成远程操作的神器啊，借助它我们可以把很多的远程操作自动化掉！下面就对 SSH 的远程操作功能进行一个小小的总结。</span></span></span></span></span></p><p style="text-align:left"><span style="font-size:10.5pt"><span style="background-color:white"><span style="font-family:DengXian"><strong><span style="font-size:21.0pt"><span style="font-family:&quot;PingFang SC&quot;,sans-serif"><span style="color:#333333">远程执行命令</span></span></span></strong></span></span></span></p><p style="text-align:left"><span style="font-size:10.5pt"><span style="background-color:white"><span style="font-family:DengXian"><span style="font-family:&quot;PingFang SC&quot;,sans-serif"><span style="color:#333333">如果我们要查看一下某台主机的磁盘使用情况，是不是必须要登录到目标主机上才能执行 df 命令呢？当然不是的，我们可以使用 ssh 命令在远程的主机上执行 df 命令，然后直接把结果显示出来。整个过程就像是在本地执行了一条命令一样：</span></span></span></span></span></p><pre><code class="language-bash">ssh nick@xxx.xxx.xxx.xxx "df -h"</code></pre><p style="text-align:left"><span style="font-size:10.5pt"><span style="background-color:white"><span style="font-family:DengXian"><span style="font-family:&quot;PingFang SC&quot;,sans-serif"><span style="color:#333333">那么如何一次执行多条命令呢？其实也很简单，使用分号把不同的命令隔起来就 OK 了：</span></span></span></span></span></p><pre><code class="language-bash">ssh nick@xxx.xxx.xxx.xxx "pwd; cat hello.txt"</code></pre><p style="text-align:left"><span style="font-size:10.5pt"><span style="background-color:white"><span style="font-family:DengXian"><span style="font-family:&quot;PingFang SC&quot;,sans-serif"><span style="color:#333333">第一条命令返回的结果： /home/nick<br />这说明用这种方式执行命令时的当前目录就是登陆用户的家目录。<br />第二条命令返回 hello.txt 文件的内容。<br />注意，当命令多于一个时最好用引号括起来，否则在有的系统中除了第一个命令，其它都是在本地执行的。</span></span></span></span></span></p><p style="text-align:left"><img src="//oss.mtjo.net/img/mtjo/e5740e14d7a9059420c0c4824f565361.png" style="height:71px; width:535px" /></p><p style="text-align:left"><span style="font-size:10.5pt"><span style="background-color:white"><span style="font-family:DengXian"><strong><span style="font-size:21.0pt"><span style="font-family:&quot;PingFang SC&quot;,sans-serif"><span style="color:#333333">执行需要交互的命令</span></span></span></strong></span></span></span></p><p style="text-align:left"><span style="font-size:10.5pt"><span style="background-color:white"><span style="font-family:DengXian"><span style="font-family:&quot;PingFang SC&quot;,sans-serif"><span style="color:#333333">有时候我们需要远程执行一些有交互操作的命令。</span></span></span></span></span></p><pre><code class="language-bash">ssh nick@xxx.xxx.xxx.xxx "sudo ls /root"ssh nick@xxx.xxx.xxx.xxx "top"</code></pre><p style="text-align:left"><img src="//oss.mtjo.net/img/mtjo/b376961b21882f1b9f8edb102ccbfeaf.png" style="height:72px; width:487px" /></p><p style="text-align:left"><span style="font-size:10.5pt"><span style="background-color:white"><span style="font-family:DengXian"><span style="font-family:&quot;PingFang SC&quot;,sans-serif"><span style="color:#333333">这两条命令虽然提示的失败原因不同，但它们有一个共同点：都需要与用户交互(需要 TTY)。所以它们失败的原因也是相同的：<br />默认情况下，当你执行不带命令的 ssh 连接时，会为你分配一个 TTY。因为此时你应该是想要运行一个 shell 会话。<br />但是当你通过 ssh 在远程主机上执行命令时，并不会为这个远程会话分配 TTY。此时 ssh 会立即退出远程主机，所以需要交互的命令也随之结束。<br />好在我们可以通过 -t 参数显式的告诉 ssh，我们需要一个 TTY 远程 shell 进行交互！<br />添加 -t 参数后，ssh 会保持登录状态，直到你退出需要交互的命令。</span></span></span></span></span></p><p style="text-align:left"><img src="//oss.mtjo.net/img/mtjo/7ef1b88901a958cf204ec0e55e9aae2e.png" style="height:69px; width:516px" /></p><p style="text-align:left"><span style="font-size:10.5pt"><span style="background-color:white"><span style="font-family:DengXian"><span style="font-family:&quot;PingFang SC&quot;,sans-serif"><span style="color:#333333">作为总结，我们看看 -t 参数的官方解释：<br />&quot;Force pseudo-terminal allocation.&nbsp; This can be used to execute arbitrary screen-based programs on a remote machine, which can be very useful, e.g. when implementing menu services.&nbsp; Multiple -t options force tty allocation, even if ssh has no local tty.&quot;<br />好吧，更强悍的是我们居然可以指定多个 -t 参数！</span></span></span></span></span></p><p style="text-align:left"><span style="font-size:10.5pt"><span style="background-color:white"><span style="font-family:DengXian"><strong><span style="font-size:21.0pt"><span style="font-family:&quot;PingFang SC&quot;,sans-serif"><span style="color:#333333">执行多行的命令</span></span></span></strong></span></span></span></p><p style="text-align:left"><span style="font-size:10.5pt"><span style="background-color:white"><span style="font-family:DengXian"><span style="font-family:&quot;PingFang SC&quot;,sans-serif"><span style="color:#333333">有时候我们可能需要随手写几行简单的逻辑，这也没有问题，ssh 能轻松搞定！</span></span></span></span></span></p><p style="text-align:left"><img src="//oss.mtjo.net/img/mtjo/4f082cc23b30efcfd383d7494cfad354.png" style="height:137px; width:363px" /></p><p style="text-align:left"><span style="font-size:10.5pt"><span style="background-color:white"><span style="font-family:DengXian"><span style="font-family:&quot;PingFang SC&quot;,sans-serif"><span style="color:#333333">你可以用单引号或双引号开头，然后写上几行命令，最后再用相同的引号来结束。<br />那么如果需要在命令中使用引号该怎么办？<br />其实针对类似的情况有一条比较通用的规则，就是混合使用单双引号。这条规则在这里也是适用的：</span></span></span></span></span></p><p style="text-align:left"><img src="//oss.mtjo.net/img/mtjo/4900d6966c57eaf425adfc587fa0f560.png" style="height:170px; width:364px" /></p><p style="text-align:left"><span style="font-size:10.5pt"><span style="background-color:white"><span style="font-family:DengXian"><span style="font-family:&quot;PingFang SC&quot;,sans-serif"><span style="color:#333333">当我们在命令中引用了变量时会怎么样呢？</span></span></span></span></span></p><p style="text-align:left"><img src="//oss.mtjo.net/img/mtjo/e23d41ae6f690b4d5b8bb16e4c8fb3e4.png" style="height:159px; width:371px" /></p><p style="text-align:left"><span style="font-size:10.5pt"><span style="background-color:white"><span style="font-family:DengXian"><span style="font-family:&quot;PingFang SC&quot;,sans-serif"><span style="color:#333333">请注意上图中的最后一行，并没有输出我们期望的 nick。这里多少有些诡异，因为如果变量没有被解释的话，输出的应该是 $name 才对。但是这里却什么都没有输出。<br />对于引用变量的写法，可以通过下面的方式保证变量被正确解释：</span></span></span></span></span></p><p style="text-align:left"><img src="//oss.mtjo.net/img/mtjo/50d3693b6bbccb9cfb2e5299288a7f12.png" style="height:68px; width:444px" /></p><p style="text-align:left"><span style="font-size:10.5pt"><span style="background-color:white"><span style="font-family:DengXian"><span style="font-family:&quot;PingFang SC&quot;,sans-serif"><span style="color:#333333">注意，我们在上图的命令中为 bash 指定了 -c 参数。</span></span></span></span></span></p><p style="text-align:left"><span style="font-size:10.5pt"><span style="background-color:white"><span style="font-family:DengXian"><strong><span style="font-size:21.0pt"><span style="font-family:&quot;PingFang SC&quot;,sans-serif"><span style="color:#333333">远程执行脚本</span></span></span></strong></span></span></span></p><p style="text-align:left"><span style="font-size:10.5pt"><span style="background-color:white"><span style="font-family:DengXian"><span style="font-family:&quot;PingFang SC&quot;,sans-serif"><span style="color:#333333">对于要完成一些复杂功能的场景，如果是仅仅能执行几个命令的话，简直是弱爆了。我们可能需要写长篇累牍的 shell 脚本去完成某项使命！此时 SSH 依然是不辱使命的好帮手(哈哈，前面的内容仅仅是开胃菜啊！)。</span></span></span></span></span></p><p style="text-align:left"><span style="font-size:10.5pt"><span style="background-color:white"><span style="font-family:DengXian"><strong><span style="font-size:16.0pt"><span style="font-family:&quot;PingFang SC&quot;,sans-serif"><span style="color:#333333">执行本地的脚本</span></span></span></strong></span></span></span></p><p style="text-align:left"><span style="font-size:10.5pt"><span style="background-color:white"><span style="font-family:DengXian"><span style="font-family:&quot;PingFang SC&quot;,sans-serif"><span style="color:#333333">我们在本地创建一个脚本文件 test.sh，内容为：</span></span></span></span></span></p><pre><code class="language-bash">lspwd</code></pre><p style="text-align:left"><span style="font-size:10.5pt"><span style="background-color:white"><span style="font-family:DengXian"><span style="font-family:&quot;PingFang SC&quot;,sans-serif"><span style="color:#333333">然后运行下面的命令：</span></span></span></span></span></p><pre><code class="language-bash">ssh nick@xxx.xxx.xxx.xxx &lt; test.sh</code></pre><p style="text-align:left"><img src="//oss.mtjo.net/img/mtjo/3dfbd3a4e58605c70971a05a2154c18c.png" style="height:290px; width:631px" /></p><p style="text-align:left"><span style="font-size:10.5pt"><span style="background-color:white"><span style="font-family:DengXian"><span style="font-family:&quot;PingFang SC&quot;,sans-serif"><span style="color:#333333">通过重定向 stdin，本地的脚本 test.sh 在远程服务器上被执行。</span></span></span></span></span></p><p style="text-align:left"><span style="font-size:10.5pt"><span style="background-color:white"><span style="font-family:DengXian"><span style="font-family:&quot;PingFang SC&quot;,sans-serif"><span style="color:#333333">接下来我们我期望能为脚本 test.sh 传递一个参数，为了验证传入的参数，在 test.sh 文件的末尾添加两行：</span></span></span></span></span></p><pre>echo $0echo $1</pre><p style="text-align:left"><span style="font-size:10.5pt"><span style="background-color:white"><span style="font-family:DengXian"><span style="font-family:&quot;PingFang SC&quot;,sans-serif"><span style="color:#333333">然后尝试执行下面的命令：</span></span></span></span></span></p><pre><code class="language-bash">ssh nick@xxx.xxx.xxx.xxx &lt; test.sh helloworldssh nick@xxx.xxx.xxx.xxx &lt; "test.sh helloworld"</code></pre><p style="text-align:left"><span style="font-size:10.5pt"><span style="background-color:white"><span style="font-family:DengXian"><span style="font-family:&quot;PingFang SC&quot;,sans-serif"><span style="color:#333333">下图显示了执行的结果：</span></span></span></span></span></p><p style="text-align:left"><img src="//oss.mtjo.net/img/mtjo/f13b6a8935c07ed68a6f6ae9410a0ab8.png" style="height:70px; width:554px" /></p><p style="text-align:left"><span style="font-size:10.5pt"><span style="background-color:white"><span style="font-family:DengXian"><span style="font-family:&quot;PingFang SC&quot;,sans-serif"><span style="color:#333333">看来上面的方法都无法为脚本传递参数。<br />要想在这种情况下(远程执行本地的脚本)执行带有参数的脚本，需要为 bash 指定 -s 参数：</span></span></span></span></span></p><pre>ssh nick@xxx.xxx.xxx.xxx &#39;bash -s&#39; &lt; test.sh helloworld</pre><p style="text-align:left"><img src="//oss.mtjo.net/img/mtjo/b223ff3aab020a7adc633b303b7b3126.png" style="height:119px; width:629px" /></p><p style="text-align:left"><span style="font-size:10.5pt"><span style="background-color:white"><span style="font-family:DengXian"><span style="font-family:&quot;PingFang SC&quot;,sans-serif"><span style="color:#333333">在上图的最后两行，输出的是 &quot;bash&quot; 和 &quot;helloworld&quot; 分别对应 $0 和 $1。</span></span></span></span></span></p><p style="text-align:left"><span style="font-size:10.5pt"><span style="background-color:white"><span style="font-family:DengXian"><strong><span style="font-size:16.0pt"><span style="font-family:&quot;PingFang SC&quot;,sans-serif"><span style="color:#333333">执行远程服务器上的脚本</span></span></span></strong></span></span></span></p><p style="text-align:left"><span style="font-size:10.5pt"><span style="background-color:white"><span style="font-family:DengXian"><span style="font-family:&quot;PingFang SC&quot;,sans-serif"><span style="color:#333333">除了执行本地的脚本，还有一种情况是脚本文件存放在远程服务器上，而我们需要远程的执行它！<br />此时在远程服务器上用户 nick 的家目录中有一个脚本 test.sh。文件的内容如下：</span></span></span></span></span></p><pre>lspwd</pre><p style="text-align:left"><span style="font-size:10.5pt"><span style="background-color:white"><span style="font-family:DengXian"><span style="font-family:&quot;PingFang SC&quot;,sans-serif"><span style="color:#333333">执行下面的命令：</span></span></span></span></span></p><pre><code class="language-bash">ssh nick@xxx.xxx.xxx.xxx "/home/nick/test.sh"</code></pre><p style="text-align:left"><img src="//oss.mtjo.net/img/mtjo/54792dff23977521ab62b0cfc3ed9e39.png" style="height:104px; width:536px" /></p><p style="text-align:left"><span style="font-size:10.5pt"><span style="background-color:white"><span style="font-family:DengXian"><span style="font-family:&quot;PingFang SC&quot;,sans-serif"><span style="color:#333333">注意，此时需要指定脚本的绝对路径！</span></span></span></span></span></p><p style="text-align:left"><span style="font-size:10.5pt"><span style="background-color:white"><span style="font-family:DengXian"><span style="font-family:&quot;PingFang SC&quot;,sans-serif"><span style="color:#333333">下面我们也尝试为脚本传递参数。在远程主机上的 test.sh 文件的末尾添加两行：</span></span></span></span></span></p><pre>echo $0echo $1</pre><p style="text-align:left"><span style="font-size:10.5pt"><span style="background-color:white"><span style="font-family:DengXian"><span style="font-family:&quot;PingFang SC&quot;,sans-serif"><span style="color:#333333">然后尝试执行下面的命令：</span></span></span></span></span></p><pre><code class="language-bash">ssh nick@xxx.xxx.xxx.xxx /home/nick/test.sh helloworld</code></pre><p style="text-align:left"><img src="//oss.mtjo.net/img/mtjo/78755251fbab16ff0a418a03f165dbbf.png" style="height:138px; width:621px" /></p><p style="text-align:left"><span style="font-size:10.5pt"><span style="background-color:white"><span style="font-family:DengXian"><span style="font-family:&quot;PingFang SC&quot;,sans-serif"><span style="color:#333333">真棒，最后两行 &quot;/home/nick/test.sh&quot; 和 &quot;helloworld&quot; 分别对应 $0 和 $1。</span></span></span></span></span></p><p style="text-align:left"><span style="font-size:10.5pt"><span style="background-color:white"><span style="font-family:DengXian"><strong><span style="font-size:21.0pt"><span style="font-family:&quot;PingFang SC&quot;,sans-serif"><span style="color:#333333">总结</span></span></span></strong></span></span></span></p><p style="text-align:left"><span style="font-size:10.5pt"><span style="background-color:white"><span style="font-family:DengXian"><span style="font-family:&quot;PingFang SC&quot;,sans-serif"><span style="color:#333333">本文通过 demo 演示了 ssh 远程操作的基本方式。这些基本用法将为我们在更复杂的场景中完成各种艰巨的任务打下基础。</span></span></span></span></span></p><p style="text-align:justify">&nbsp;</p>]]>
                        
                    </content>
                </entry>
            
                <entry>
                    <title><![CDATA[使用 systemd 限制系统资源的使用]]></title>
                    <link rel="alternate" type="text/html"
                          href="/archives/使用systemd限制系统资源的使用"/>
                    <id>tag:http://mtjo.net,2021-09-04:使用systemd限制系统资源的使用</id>
                    <published>2021-09-04T02:17:22+08:00</published>
                    <updated>2021-10-21T00:07:04+08:00</updated>
                    <author>
                        <name>MTJO</name>
                        <uri>http://mtjo.net</uri>
                    </author>
                    <content type="html">
                        
                            <![CDATA[<h2><img src="//oss.mtjo.net/img/mtjo/def89a494b399c43634a712e73cb8851.png" /></h2><h2>简单介绍</h2><p>在基于 Linux-3.x 内核版本的很多发行版都提供了&nbsp;<a href="https://www.freedesktop.org/wiki/Software/systemd/" target="_blank">Systemd</a>&nbsp;来管理系统和服务. 同时也将 cgroup 功能加到了 slice, scope 和 service 三个单元中, 详见&nbsp;<a href="https://access.redhat.com/documentation/en-us/red_hat_enterprise_linux/7/html-single/resource_management_guide/index#sec-Default_Cgroup_Hierarchies" target="_blank">sec-Default_Cgroup_Hierarchies</a>. 基于这些特性我们可以很方便的通过 systemd 来限制服务或者进程对系统资源的使用, 这在单主机多服务的场景下会很有用. 下面则以 MySQL 服务为例介绍如何使用 systemd 限制资源的使用, 其它服务的限制和此等同.</p><h2>示例使用</h2><p>以 Centos7 系统为例, 从&nbsp;<a href="https://access.redhat.com/documentation/en-us/red_hat_enterprise_linux/7/html-single/resource_management_guide/index" target="_blank">redhat-resource-control</a>&nbsp;的文档来看, 官方建议通过 service 来实现资源的限制, 所以这里我们增加可以带端口参数(如果单台主机有多个 MySQL 实例的话)启动的 mysql 服务:</p><pre><code class="language-ini"># cat /usr/lib/systemd/system/mysql@.service                                   [Unit]Description=MySQL Server node%i[Service]Type=forkingEnvironment="PORT_ARGS=%I"PermissionsStartOnly=trueExecStart=/usr/local/mysqlnode/bin/node ${PORT_ARGS} startExecStop=/usr/local/mysqlnode/bin/node ${PORT_ARGS} stop[Install]WantedBy=multi-user.target</code></pre><p>上述服务以 fork 方式启动服务,&nbsp;<code>@</code>&nbsp;符号之后的端口号即为相应的端口参数, 启动后查看对应服务状态:</p><pre><code class="language-bash"># systemctl start mysql@3327 # systemctl status mysql@3327● mysql@3327.service - MySQL Server node3327   Loaded: loaded (/usr/lib/systemd/system/mysql@.service; disabled; vendor preset: disabled)   Active: active (running) since Fri 2018-12-07 21:31:32 CST; 4s ago  Process: 58084 ExecStart=/usr/local/mysqlnode/bin/node ${PORT_ARGS} start (code=exited, status=0/SUCCESS) Main PID: 58159 (mysqld_safe)   CGroup: /system.slice/system-mysql.slice/mysql@3327.service           ├─58159 /bin/sh /opt/Percona-Server-5.6.38-rel83.0-Linux.x86_64.ssl101//bin/mysqld_safe --defaults-file=/export/mysql/node3327/my.node.cnf           ├─59489 /opt/Percona-Server-5.6.38-rel83.0-Linux.x86_64.ssl101/bin/mysqld --defaults-file=/export/mysql/node3327/my.node.cnf --basedir=/opt/Percona-Server-5.6.38-rel83.0-Linux.x86_64.ssl101 --datadir=/export/mysql/node3327/...           └─59490 logger -t mysqld-3327 -p daemon.error</code></pre><p>通过 systemd 增加 cgroup 限制，可以一次设置单项属性值, 也可以一次设置多项：</p><pre><code class="language-bash"># systemctl set-property mysql@3327.service MemoryLimit=5G       # 5G 内存# systemctl set-property mysql@3327.service CPUQuota=150%        # 150% cpu 使用率# systemctl set-property mysql@3327.service BlockIOWeight=1000   # IO 权重# systemctl status mysql@3327● mysql@3327.service - MySQL Server node3327   Loaded: loaded (/usr/lib/systemd/system/mysql@.service; disabled; vendor preset: disabled)  Drop-In: /etc/systemd/system/mysql@3327.service.d           └─50-MemoryLimit.conf   Active: active (running) since Fri 2018-12-07 21:31:32 CST; 1min 18s ago  Process: 58084 ExecStart=/usr/local/mysqlnode/bin/node ${PORT_ARGS} start (code=exited, status=0/SUCCESS) Main PID: 58159 (mysqld_safe)   Memory: 1.3M (limit: 5G)            # 内存限制 5G   CGroup: /system.slice/system-mysql.slice/mysql@3327.service           ├─58159 /bin/sh /opt/Percona-Server-5.6.38-rel83.0-Linux.x86_64.ssl101//bin/mysqld_safe --defaults-file=/export/mysql/node3327/my.node.cnf           ├─59489 /opt/Percona-Server-5.6.38-rel83.0-Linux.x86_64.ssl101/bin/mysqld --defaults-file=/export/mysql/node3327/my.node.cnf --basedir=/opt/Percona-Server-5.6.38-rel83.0-Linux.x86_64.ssl101 --datadir=/export/mysql/node3327/...           └─59490 logger -t mysqld-3327 -p daemon.error</code></pre><p>更多属性参见&nbsp;<code>man systemd.resource-control</code>, 不过一些参数没有对应的属性, 需要手动单独设置, 比如设置单独某个服务的&nbsp;<code>memory + swap</code>&nbsp;限制, 可以使用以下命令将限制的字节数写到对应的参数文件中:</p><pre><code class="language-bash">echo xxxxxx &gt; memory.memsw.limit_in_bytes</code></pre><p>查看 MySQL 进程 cgroup 信息, 可以看到 memory, blkid, cpuacct 三个条目对应的信息:</p><pre><code class="language-bash"># cat /proc/59489/cgroup 11:memory:/system.slice/system-mysql.slice/mysql@3327.service10:devices:/system.slice/system-mysql.slice9:cpuset:/8:blkio:/system.slice/system-mysql.slice/mysql@3327.service7:perf_event:/6:hugetlb:/5:freezer:/4:cpuacct,cpu:/system.slice/system-mysql.slice3:pids:/system.slice/system-mysql.slice2:net_prio,net_cls:/1:name=systemd:/system.slice/system-mysql.slice/mysql@3327.service</code></pre><p>查看进程相关的限制值:</p><pre><code class="language-bash"># cat /sys/fs/cgroup/memory/system.slice/system-mysql.slice/mysql\@3327.service/memory.limit_in_bytes 5368709120# cat /sys/fs/cgroup/blkio/system.slice/system-mysql.slice/mysql\@3327.service/blkio.weight1000# cat /sys/fs/cgroup/cpu/system.slice/system-mysql.slice/mysql\@3327.service/cpu.cfs_quota_us 150000</code></pre><h2>简单验证</h2><p>这里仅以不同的 CPUQuota 为例说明, 如下所示可以看到, MySQL 进程在不同&nbsp;<code>CPUQuota</code>&nbsp;限制下的不同表现,&nbsp;<code>benchyou</code>&nbsp;的压测结果也相差较大.</p><h4>限制进程 CPUQuota 为 150% 的情况下:</h4><pre><code class="language-bash"># top -p 59489   PID USER      PR  NI    VIRT    RES    SHR S  %CPU %MEM     TIME+ COMMAND                                                                                            59489 mysql     20   0 3412052 1.468g   8784 S 149.5  2.3   7:08.22 mysqld# benchyou --oltp-tables-count=256 --read-threads=30 --update-threads 8 --write-threads 6 --delete-threads=5 --mysql-table-engine=innodb ..time            thds              tps     wtps    rtps    rio    rio/op   wio    wio/op    rMB     rKB/op    wMB     wKB/op   cpu/op  freeMB  cacheMB   w-rsp(ms)  r-rsp(ms)    total-number[13s]        [r:30,w:6,u:8,d:5]  3323     304     3019    0      0.00     0      0.00      0.00    0.00      0.00    0.00     0.00    0       0         62.56      9.92         40765time            thds              tps     wtps    rtps    rio    rio/op   wio    wio/op    rMB     rKB/op    wMB     wKB/op   cpu/op  freeMB  cacheMB   w-rsp(ms)  r-rsp(ms)    total-number[14s]        [r:30,w:6,u:8,d:5]  3319     325     2994    0      0.00     0      0.00      0.00    0.00      0.00    0.00     0.00    0       0         57.21      9.99         44084</code></pre><h4>限制进程 CPUQuota 为 400% 情况下:</h4><pre><code class="language-bash"># top -p 59489   PID USER      PR  NI    VIRT    RES    SHR S  %CPU %MEM     TIME+ COMMAND                                                                                            59489 mysql     20   0 3416472 1.474g   8796 S 400.0  2.4   7:47.42 mysqld # benchyou --oltp-tables-count=256 --read-threads=30 --update-threads 8 --write-threads 6 --delete-threads=5 --mysql-table-engine=innodb ..time            thds              tps     wtps    rtps    rio    rio/op   wio    wio/op    rMB     rKB/op    wMB     wKB/op   cpu/op  freeMB  cacheMB   w-rsp(ms)  r-rsp(ms)    total-number[10s]        [r:30,w:6,u:8,d:5]  10547    967     9580    0      0.00     0      0.00      0.00    0.00      0.00    0.00     0.00    0       0         19.49      3.12         96270time            thds              tps     wtps    rtps    rio    rio/op   wio    wio/op    rMB     rKB/op    wMB     wKB/op   cpu/op  freeMB  cacheMB   w-rsp(ms)  r-rsp(ms)    total-number[11s]        [r:30,w:6,u:8,d:5]  10829    1036    9793    0      0.00     0      0.00      0.00    0.00      0.00    0.00     0.00    0       0         18.23      3.04         107099</code></pre><h2>会话级别限制</h2><p>如果没有以 service 启动, 可以按照 pid 查看会话级别的信息:</p><pre><code class="language-bash"># systemctl status 303   # 303 为 mysql 进程 id● session-31208.scope - Session 31208 of user root</code></pre><p><code>session-31208.scope</code>&nbsp;即为会话级别的信息, 一个会话可能包含多个 MySQL 进程, 使用上述的&nbsp;<code>systemctl set-property session-31208.scope XXXX</code>&nbsp;即可对整个会话的进程进行相关的限制. 当然使用这种方式即是对多个进程总体使用情况的限制.</p><h2>其它限制</h2><p>如果要单独限制 1 个进程 id, 则需要借助&nbsp;<code>libcgroup</code>&nbsp;提供的工具, 具体的使用同 Centos6 的设置, 不过 Centos7 已经弃用了&nbsp;<code>libgcgroup-tools</code>, 不再建议使用, 如果要对单独进程进行限制, 最好使用&nbsp;<code>service</code>&nbsp;进行启动. 另外从&nbsp;<code>systemd</code>&nbsp;提供的&nbsp;<a href="https://www.freedesktop.org/wiki/Software/systemd/ControlGroupInterface/" target="_blank">ControlGroupInterface</a>&nbsp;来看, 其提供的控制选项还不够精细, 比如没有 memsw, cpuset 等设置的属性, 这种情况下如果有限制的需求, 还需要靠和以前一样的 libcgroup-tool 方式来设置, 比如以下设置, 限制 pid 为 59489 的进程仅使用 cpu 0 ~ 5, mem 可以是 cpu node0 或 node1, cgclassify 没有指定&nbsp;<code>--sticky</code>&nbsp;选项的话则 tasks 会包含指定进程的子进程信息:</p><pre><code class="language-bash"># cgcreate -g  cpuset:mysql@3327.service# cgset -r cpuset.cpus=0-5 mysql@3327.service# cgset -r cpuset.mems=0-1 mysql@3327.service# cgclassify -g cpuset:mysql@3327.service 59489</code></pre><p>当然也可以使用红帽知识库的方式在启动进程的时候就限制相应的 cpuset 等选项, 详见&nbsp;<a href="https://access.redhat.com/solutions/1445073" target="_blank">redhat-1445073</a></p><h2>参考</h2><p><a href="https://access.redhat.com/documentation/en-us/red_hat_enterprise_linux/7/html-single/resource_management_guide/index" target="_blank">resource_management_guide</a><br /><a href="https://access.redhat.com/solutions/1445073" target="_blank">redhat-1445073</a><br /><a href="https://www.freedesktop.org/software/systemd/man/systemd.resource-control.html" target="_blank">systemd.resource-control</a><br /><a href="https://www.freedesktop.org/software/systemd/man/systemctl.html" target="_blank">systemctl</a></p>]]>
                        
                    </content>
                </entry>
            
                <entry>
                    <title><![CDATA[如何更规范化编写Java 代码]]></title>
                    <link rel="alternate" type="text/html"
                          href="/archives/如何更规范化编写Java代码"/>
                    <id>tag:http://mtjo.net,2021-08-25:如何更规范化编写Java代码</id>
                    <published>2021-08-25T20:51:24+08:00</published>
                    <updated>2021-10-20T23:59:26+08:00</updated>
                    <author>
                        <name>MTJO</name>
                        <uri>http://mtjo.net</uri>
                    </author>
                    <content type="html">
                        
                            <![CDATA[<p><em><strong>背景：</strong></em>如何更规范化编写Java 代码的重要性想必毋需多言，其中最重要的几点当属提高代码性能、使代码远离Bug、令代码更优雅。</p><p><strong><em>一、MyBatis 不要为了多个查询条件而写 1 = 1</em></strong></p><p>&nbsp;&nbsp;&nbsp;&nbsp;&nbsp; 当遇到多个查询条件，使用where 1=1 可以很方便的解决我们的问题，但是这样很可能会造成非常大的性能损失，因为添加了 &ldquo;where 1=1 &rdquo;的过滤条件之后，数据库系统就无法使用索引等查询优化策略，数据库系统将会被迫对每行数据进行扫描（即全表扫描） 以比较此行是否满足过滤条件，当表中的数据量较大时查询速度会非常慢；此外，还会存在SQL 注入的风险。</p><p><strong><em>反例：</em></strong></p><pre><code class="language-xml">&lt;select id="queryBookInfo" parameterType="com.tjt.platform.entity.BookInfo" resultType="java.lang.Integer"&gt; select count(*) from t_rule_BookInfo t where 1=1&lt;if test="title !=null and title !='' "&gt; AND title = #{title} &lt;/if&gt; &lt;if test="author !=null and author !='' "&gt; AND author = #{author}&lt;/if&gt; &lt;/select&gt;</code></pre><p>&nbsp;</p><p><strong><em>正例：</em></strong></p><pre><code class="language-xml">&lt;select id="queryBookInfo" parameterType="com.tjt.platform.entity.BookInfo" resultType="java.lang.Integer"&gt; select count(*) from t_rule_BookInfo t&lt;where&gt;&lt;if test="title !=null and title !='' "&gt; title = #{title} &lt;/if&gt;&lt;if test="author !=null and author !='' "&gt;  AND author = #{author}&lt;/if&gt;&lt;/where&gt; &lt;/select&gt;</code></pre><p>&nbsp;</p><p>UPDATE 操作也一样，可以用&lt;set&gt; 标记代替 1=1。</p><p><em><strong>二、 迭代entrySet() 获取Map 的key 和value</strong></em></p><p>&nbsp;&nbsp;&nbsp;&nbsp;&nbsp; 当循环中只需要获取Map 的主键key时，迭代keySet() 是正确的；但是，当需要主键key 和取值value 时，迭代entrySet() 才是更高效的做法，其比先迭代keySet() 后再去通过get 取值性能更佳。</p><p><strong><em>反例：</em></strong></p><pre><code class="language-java">//Map 获取value 反例:HashMap&lt;String, String&gt; map = new HashMap&lt;&gt;();for (String key : map.keySet()){    String value = map.get(key);}</code></pre><p><em><strong>正例：</strong></em></p><pre><code class="language-java">//Map 获取key &amp; value 正例:HashMap&lt;String, String&gt; map = new HashMap&lt;&gt;();for (Map.Entry&lt;String,String&gt; entry : map.entrySet()){   String key = entry.getKey();   String value = entry.getValue();}</code></pre><p><strong><em>三、使用Collection.isEmpty() 检测空</em></strong></p><p>&nbsp;&nbsp;&nbsp;&nbsp;&nbsp; 使用Collection.size() 来检测是否为空在逻辑上没有问题，但是使用Collection.isEmpty() 使得代码更易读，并且可以获得更好的性能；除此之外，任何Collection.isEmpty() 实现的时间复杂度都是O(1) ，不需要多次循环遍历，但是某些通过Collection.size() 方法实现的时间复杂度可能是O(n)。<a href="https://www.cnblogs.com/taojietaoge/p/10947214.html">O(1)纬度减少循环次数 例子</a></p><p><em><strong>反例：</strong></em></p><pre><code class="language-java">LinkedList&lt;Object&gt; collection = new LinkedList&lt;&gt;();if (collection.size() == 0){    System.out.println("collection is empty.");}</code></pre><p><strong><em>正例：</em></strong></p><pre><code class="language-java">LinkedList&lt;Object&gt; collection = new LinkedList&lt;&gt;();if (collection.isEmpty()){   System.out.println("collection is empty.");}//检测是否为null 可以使用CollectionUtils.isEmpty()if (CollectionUtils.isEmpty(collection)){   System.out.println("collection is null.");}</code></pre><p>&nbsp;</p><p><strong><em>四、初始化集合时尽量指定其大小</em></strong></p><p>&nbsp;&nbsp;&nbsp;&nbsp;&nbsp; 尽量在初始化时指定集合的大小，能有效减少集合的扩容次数，因为集合每次扩容的时间复杂度很可能时O(n)，耗费时间和性能。</p><p><em><strong>反例：</strong></em></p><pre><code class="language-java">//初始化list，往list 中添加元素反例：int[] arr = new int[]{1,2,3,4};List&lt;Integer&gt; list = new ArrayList&lt;&gt;();for (int i : arr){    list.add(i);}</code></pre><p><strong><em>正例：</em></strong></p><pre><code class="language-java">//初始化list，往list 中添加元素正例：int[] arr = new int[]{1,2,3,4};//指定集合list 的容量大小List&lt;Integer&gt; list = new ArrayList&lt;&gt;(arr.length);for (int i : arr){   list.add(i);}</code></pre><p>&nbsp;</p><p><em><strong>五、使用StringBuilder 拼接字符串</strong></em></p><p>&nbsp;&nbsp;&nbsp;&nbsp;&nbsp; 一般的字符串拼接在编译期Java 会对其进行优化，但是在循环中字符串的拼接Java 编译期无法执行优化，所以需要使用StringBuilder 进行替换。</p><p><em><strong>反例：</strong></em></p><pre><code class="language-java">//在循环中拼接字符串反例String str = "";for (int i = 0; i &lt; 10; i++){  //在循环中字符串拼接Java 不会对其进行优化  str += i;}</code></pre><p><strong><em>正例：</em></strong></p><pre><code class="language-java">//在循环中拼接字符串正例String str1 = "Love";String str2 = "Courage";String strConcat = str1 + str2;  //Java 编译器会对该普通模式的字符串拼接进行优化StringBuilder sb = new StringBuilder();for (int i = 0; i &lt; 10; i++){ //在循环中，Java 编译器无法进行优化，所以要手动使用StringBuilder  sb.append(i);}</code></pre><p>&nbsp;</p><p><em><strong>&nbsp;六、若需频繁调用Collection.contains 方法则使用Set</strong></em></p><p>&nbsp;&nbsp;&nbsp;&nbsp;&nbsp; 在Java 集合类库中，List的contains 方法普遍时间复杂度为O(n)，若代码中需要频繁调用contains 方法查找数据则先将集合list 转换成HashSet 实现，将O(n) 的时间复杂度将为O(1)。</p><p><em><strong>反例：</strong></em></p><pre><code class="language-java">//频繁调用Collection.contains() 反例List&lt;Object&gt; list = new ArrayList&lt;&gt;();for (int i = 0; i &lt;= Integer.MAX_VALUE; i++){    //时间复杂度为O(n)    if (list.contains(i))    System.out.println("list contains "+ i);}</code></pre><p><strong><em>正例：</em></strong></p><pre><code class="language-java">//频繁调用Collection.contains() 正例List&lt;Object&gt; list = new ArrayList&lt;&gt;();Set&lt;Object&gt; set = new HashSet&lt;&gt;();for (int i = 0; i &lt;= Integer.MAX_VALUE; i++){    //时间复杂度为O(1)    if (set.contains(i)){        System.out.println("list contains "+ i);    }}</code></pre><p><em><strong>七、使用静态代码块实现赋值静态成员变量</strong></em></p><p>&nbsp;&nbsp;&nbsp;&nbsp;&nbsp; 对于集合类型的静态成员变量，应该使用静态代码块赋值，而不是使用集合实现来赋值。</p><p><em><strong>反例：</strong></em></p><pre>//赋值静态成员变量反例</pre><pre><code class="language-java">private static Map&lt;String, Integer&gt; map = new HashMap&lt;String, Integer&gt;(){    {        map.put("Leo",1);        map.put("Family-loving",2);        map.put("Cold on the out side passionate on the inside",3);    }};private static List&lt;String&gt; list = new ArrayList&lt;&gt;(){    {        list.add("Sagittarius");        list.add("Charming");        list.add("Perfectionist");    }};</code></pre><p><strong><em>正例：</em></strong></p><pre><code class="language-java">//赋值静态成员变量正例private static Map&lt;String, Integer&gt; map = new HashMap&lt;String, Integer&gt;();   static {       map.put("Leo",1);       map.put("Family-loving",2);       map.put("Cold on the out side passionate on the inside",3);   }   private static List&lt;String&gt; list = new ArrayList&lt;&gt;();   static {       list.add("Sagittarius");       list.add("Charming");       list.add("Perfectionist");   }</code></pre><p><strong><em>八、删除未使用的局部变量、方法参数、私有方法、字段和<strong><em>多余的括号</em></strong>。</em></strong></p><p><em><strong>九、工具类中屏蔽构造函数</strong></em></p><p>&nbsp;&nbsp;&nbsp;&nbsp;&nbsp; 工具类是一堆静态字段和函数的集合，其不应该被实例化；但是，Java 为每个没有明确定义构造函数的类添加了一个隐式公有构造函数，为了避免不必要的实例化，应该显式定义私有构造函数来屏蔽这个隐式公有构造函数。</p><p><em><strong>反例：</strong></em></p><pre><code class="language-java">public class PasswordUtils {    //工具类构造函数反例    private static final Logger LOG = LoggerFactory.getLogger(PasswordUtils.class);    public static final String DEFAULT_CRYPT_ALGO = "PBEWithMD5AndDES";    public static String encryptPassword(String aPassword) throws IOException {        return new PasswordUtils(aPassword).encrypt();    }</code></pre><p><strong><em>正例：</em></strong></p><pre><code class="language-java">public class PasswordUtils {    //工具类构造函数正例    private static final Logger LOG = LoggerFactory.getLogger(PasswordUtils.class);    //定义私有构造函数来屏蔽这个隐式公有构造函数    private PasswordUtils(){}        public static final String DEFAULT_CRYPT_ALGO = "PBEWithMD5AndDES";    public static String encryptPassword(String aPassword) throws IOException {        return new PasswordUtils(aPassword).encrypt();    }</code></pre><p><em><strong>十、删除多余的异常捕获并抛出</strong></em></p><p>&nbsp;&nbsp;&nbsp;&nbsp;&nbsp; 用catch 语句捕获异常后，若什么也不进行处理，就只是让异常重新抛出，这跟不捕获异常的效果一样，可以删除这块代码或添加别的处理。</p><p><em><strong>反例：</strong></em></p><p>&nbsp;</p><pre><code class="language-java">//多余异常反例private static String fileReader(String fileName)throws IOException{    try (BufferedReader reader = new BufferedReader(new FileReader(fileName))) {        String line;        StringBuilder builder = new StringBuilder();        while ((line = reader.readLine()) != null) {            builder.append(line);        }        return builder.toString();    } catch (Exception e) {        //仅仅是重复抛异常 未作任何处理        throw e;    }}</code></pre><p><strong><em>正例：</em></strong></p><pre><code class="language-java">//多余异常正例private static String fileReader(String fileName)throws IOException{    try (BufferedReader reader = new BufferedReader(new FileReader(fileName))) {        String line;        StringBuilder builder = new StringBuilder();        while ((line = reader.readLine()) != null) {            builder.append(line);        }        return builder.toString();        //删除多余的抛异常，或增加其他处理：        /*catch (Exception e) {            return "fileReader exception";        }*/    }}</code></pre><p><em><strong>十一、字符串转化使用String.valueOf(value) 代替 &quot; &quot; + value</strong></em></p><p>&nbsp;&nbsp;&nbsp;&nbsp;&nbsp; 把其它对象或类型转化为字符串时，使用String.valueOf(value) 比 &quot;&quot;+value 的效率更高。</p><p><em><strong>反例：</strong></em></p><pre><code class="language-java">//把其它对象或类型转化为字符串反例：int num = 520;// "" + valueString strLove = "" + num;</code></pre><p><strong><em>正例：</em></strong></p><pre><code class="language-java">//把其它对象或类型转化为字符串正例：int num = 520;// String.valueOf() 效率更高String strLove = String.valueOf(num);</code></pre><p><em><strong>十二、避免使用BigDecimal(double)</strong></em></p><p>&nbsp;&nbsp;&nbsp;&nbsp;&nbsp; BigDecimal(double) 存在精度损失风险，在精确计算或值比较的场景中可能会导致业务逻辑异常。</p><p><em><strong>反例：</strong></em></p><pre><code class="language-java">// BigDecimal 反例    BigDecimal bigDecimal = new BigDecimal(0.11D);</code></pre><p><strong><em>正例：</em></strong></p><pre><code class="language-java">// BigDecimal 正例BigDecimal bigDecimal1 = bigDecimal.valueOf(0.11D);</code></pre><p><strong>图1. BigDecimal 精度丢失</strong></p><p><img alt="" src="//oss.mtjo.net/img/mtjo/3f9b9ffb671dbd96ddeffc2c23de7c5f.png" /></p><p><em><strong>十三、返回空数组和集合而非 null</strong></em></p><p>&nbsp;&nbsp;&nbsp;&nbsp;&nbsp; 若程序运行返回null，需要调用方强制检测null，否则就会抛出空指针异常；返回空数组或空集合，有效地避免了调用方因为未检测null 而抛出空指针异常的情况，还可以删除调用方检测null 的语句使代码更简洁。</p><p><em><strong>反例：</strong></em></p><pre><code class="language-java">//返回null 反例   public static Result[] getResults() {       return null;   }   public static List&lt;Result&gt; getResultList() {       return null;   }   public static Map&lt;String, Result&gt; getResultMap() {       return null;   }</code></pre><p><strong><em>正例：</em></strong></p><pre><code class="language-java">//返回空数组和空集正例   public static Result[] getResults() {       return new Result[0];   }   public static List&lt;Result&gt; getResultList() {       return Collections.emptyList();   }   public static Map&lt;String, Result&gt; getResultMap() {       return Collections.emptyMap();   }</code></pre><p><strong><em>十四、优先使用常量或确定值调用equals 方法</em></strong></p><p>&nbsp;&nbsp;&nbsp;&nbsp;&nbsp; 对象的equals 方法容易抛空指针异常，应使用常量或确定有值的对象来调用equals 方法。</p><p><em><strong>反例：</strong></em></p><pre><code class="language-java">//调用 equals 方法反例    private static boolean fileReader(String fileName)throws IOException{        // 可能抛空指针异常        return fileName.equals("Charming"); }</code></pre><p><strong><em>正例：</em></strong></p><pre><code class="language-java">//调用 equals 方法正例    private static boolean fileReader(String fileName)throws IOException{        // 使用常量或确定有值的对象来调用 equals 方法        return "Charming".equals(fileName);                //或使用： java.util.Objects.equals() 方法       return Objects.equals("Charming",fileName); }</code></pre><p><em><strong>十五、枚举的属性字段必须是私有且不可变</strong></em></p><p>&nbsp;&nbsp;&nbsp;&nbsp;&nbsp; 枚举通常被当做常量使用，如果枚举中存在公共属性字段或设置字段方法，那么这些枚举常量的属性很容易被修改；理想情况下，枚举中的属性字段是私有的，并在私有构造函数中赋值，没有对应的Setter 方法，最好加上final 修饰符。</p><p><em><strong>反例：</strong></em></p><pre><code class="language-java">public enum SwitchStatus {    // 枚举的属性字段反例    DISABLED(0, "禁用"),    ENABLED(1, "启用");    public int value;    private String description;    private SwitchStatus(int value, String description) {        this.value = value;        this.description = description;    }    public String getDescription() {        return description;    }    public void setDescription(String description) {        this.description = description;    }}</code></pre><p><strong><em>正例：</em></strong></p><pre><code class="language-java">public enum SwitchStatus {    // 枚举的属性字段正例    DISABLED(0, "禁用"),    ENABLED(1, "启用");    // final 修饰    private final int value;    private final String description;    private SwitchStatus(int value, String description) {        this.value = value;        this.description = description;    }    // 没有Setter 方法    public int getValue() {        return value;    }    public String getDescription() {        return description;    }}</code></pre><p><strong><em>
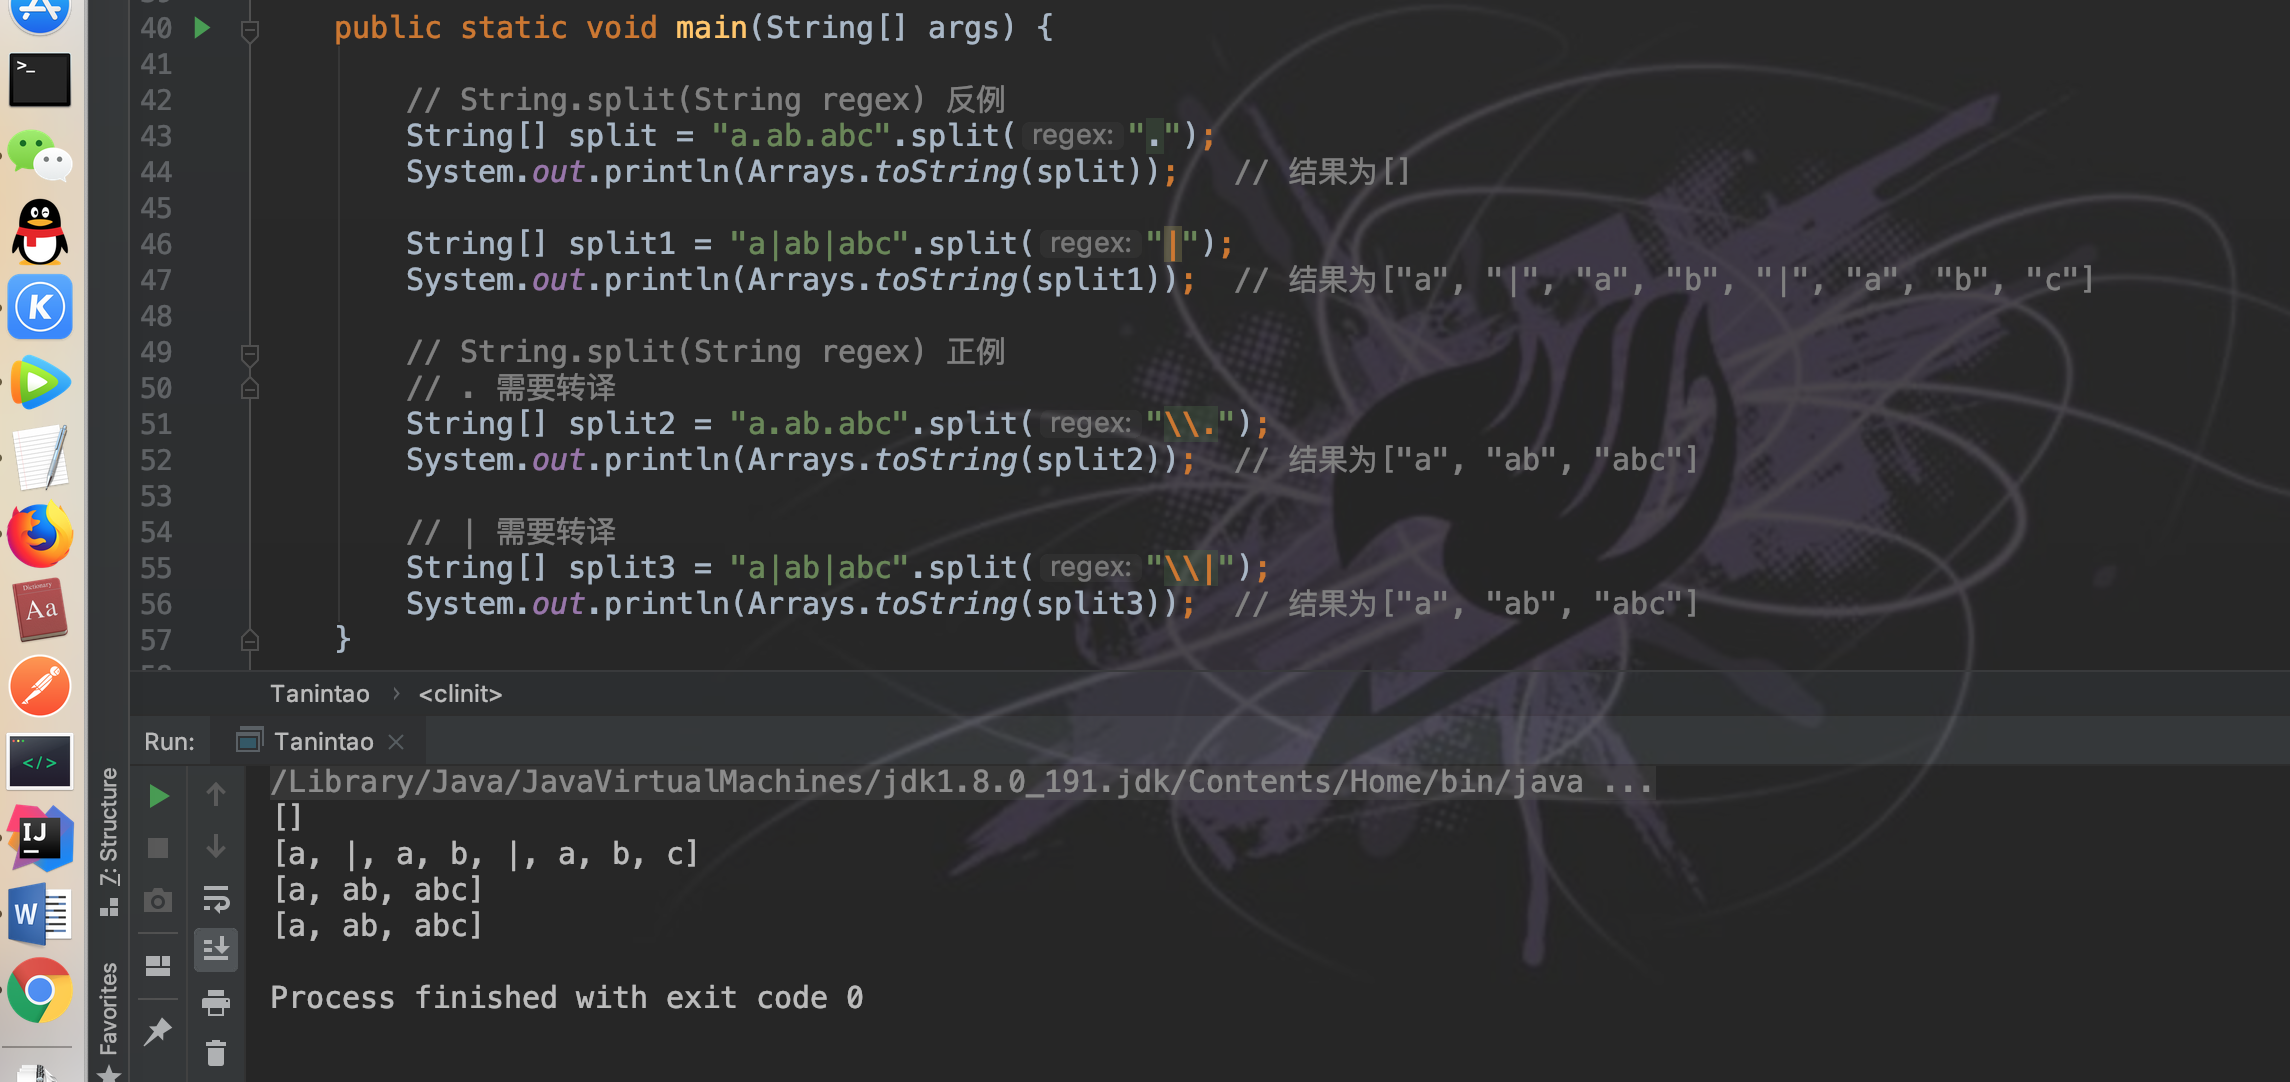
十六、tring.split(String regex)部分关键字需要转译</em></strong></p><p>&nbsp;&nbsp;&nbsp;&nbsp;&nbsp; 使用字符串String 的plit 方法时，传入的分隔字符串是正则表达式，则部分关键字（比如 .[]()\| 等）需要转义。</p><p><em><strong>反例：</strong></em></p><pre><code class="language-java">// String.split(String regex) 反例String[] split = "a.ab.abc".split(".");System.out.println(Arrays.toString(split));   // 结果为[]String[] split1 = "a|ab|abc".split("|");System.out.println(Arrays.toString(split1));  // 结果为["a", "|", "a", "b", "|", "a", "b", "c"]</code></pre><p><strong><em>正例：</em></strong></p><pre><code class="language-java">// String.split(String regex) 正例// . 需要转译String[] split2 = "a.ab.abc".split("\\.");System.out.println(Arrays.toString(split2));  // 结果为["a", "ab", "abc"]// | 需要转译String[] split3 = "a|ab|abc".split("\\|");System.out.println(Arrays.toString(split3));  // 结果为["a", "ab", "abc"]</code></pre><p>&nbsp;</p><p><strong>图2. String.split(String regex) 正反例</strong></p><p><img alt="" src="//oss.mtjo.net/img/mtjo/240cd986d97dd24b84b65022e6519a2c.png" /></p><p>&nbsp;</p>]]>
                        
                    </content>
                </entry>
            
                <entry>
                    <title><![CDATA[精简 迅雷 for MAC]]></title>
                    <link rel="alternate" type="text/html"
                          href="/archives/精简迅雷forMAC"/>
                    <id>tag:http://mtjo.net,2021-08-07:精简迅雷forMAC</id>
                    <published>2021-08-07T04:44:22+08:00</published>
                    <updated>2021-10-20T23:52:09+08:00</updated>
                    <author>
                        <name>MTJO</name>
                        <uri>http://mtjo.net</uri>
                    </author>
                    <content type="html">
                        
                            <![CDATA[<p><span style="font-size:18px">官方下载安装的迅雷有很多没有用的功能，还有很多广告，本文提供精简方法</span></p><h2>方法一：打开插件目录手动删除</h2><p>打开Finder-&gt;应用程序-&gt;迅雷-&gt;Contents-&gt;PlugIns</p><p>或者用终端打开</p><pre><code class="language-bash">open /Applications/Thunder.app/Contents/PlugIns/</code></pre><p>打开后你会看到</p><p><img alt="" src="//oss.mtjo.net/img/mtjo/cabfba9cdea3cdf6465399442864c6a7.png" /></p><p>根据文件名称都好理解其作用，手动删除掉即可精简</p><p>示例:</p><pre><code class="language-bash">advertising.xlplugin 左下角live提示广告（删除）applications.xlplugin 应用（不建议删除，因为偏好设定及离线空间依赖该页面）bbassistant.xlplugin 宽带助手 （可删除）browserhelper.xlplugin 浏览器支持（可删除）details.xlplugin 任务详情/评论（可删除，删除后无法查看任务详情）featuredpage.xlplugin 精选（删除）myvip.xlplugin 我的会员（删除）playgame.xlplugin 玩一玩（删除）settings.xlplugin 偏好设定（不建议删除，删除后无法设置）subtitle.xlplugin 搜索字幕（可删除，删除后无法进行右键搜索字幕）thunderstore.xlplugin 软件中心（删除）viprenew.xlplugin 立即续费提示（删除）xiazaibao.xlplugin 下载宝（删除）xlbrowser.xlplugin 搜索（删除）xlplayer.xlplugin 迅雷播放器（删除，删除后点击播放自动调用QuickTime Player播放）</code></pre><pre>等等...</pre><h2>方法二：使用命令行清除</h2><pre><code class="language-bash">rm -rf /Applications/Thunder.app/Contents/PlugIns/activitycenter.xlpluginrm -rf /Applications/Thunder.app/Contents/PlugIns/advertising.xlplugin rm -rf /Applications/Thunder.app/Contents/PlugIns/bbassistant.xlplugin rm -rf /Applications/Thunder.app/Contents/PlugIns/details.xlplugin rm -rf /Applications/Thunder.app/Contents/PlugIns/liveupdate.xlplugin rm -rf /Applications/Thunder.app/Contents/PlugIns/livestream.xlplugin rm -rf /Applications/Thunder.app/Contents/PlugIns/myvip.xlplugin rm -rf /Applications/Thunder.app/Contents/PlugIns/viptask.xlplugin rm -rf /Applications/Thunder.app/Contents/PlugIns/viptips.xlplugin rm -rf /Applications/Thunder.app/Contents/PlugIns/webgame.xlplugin rm -rf /Applications/Thunder.app/Contents/PlugIns/viprenew.xlplugin rm -rf /Applications/Thunder.app/Contents/PlugIns/onethingcloud.xlplugin rm -rf /Applications/Thunder.app/Contents/PlugIns/featuredpage.xlplugin</code></pre><p>下面放上精简前后对比</p><p>精简前：</p><p><img alt="" src="//oss.mtjo.net/img/mtjo/218210936038be2780b075fb76ce71cc.png" /></p><p>精简后：</p><p><img alt="" src="//oss.mtjo.net/img/mtjo/0497edef1928acbb8544fd3042e188f9.png" /></p><p><span style="font-size:12px">界面是不是清爽了很多</span></p>]]>
                        
                    </content>
                </entry>
            
                <entry>
                    <title><![CDATA[Dnsmasq 配置文件详解]]></title>
                    <link rel="alternate" type="text/html"
                          href="/archives/Dnsmasq配置文件详解"/>
                    <id>tag:http://mtjo.net,2021-07-18:Dnsmasq配置文件详解</id>
                    <published>2021-07-18T22:07:57+08:00</published>
                    <updated>2021-10-20T23:51:22+08:00</updated>
                    <author>
                        <name>MTJO</name>
                        <uri>http://mtjo.net</uri>
                    </author>
                    <content type="html">
                        
                            <![CDATA[<pre><img src="//oss.mtjo.net/img/mtjo/0783b9a768e5d7d91d47fc8e55293aad.jpeg" /></pre><pre><code class="language-bash">###############################################################################        DNS 选项################################################################################ 不加载本地的 /etc/hosts 文件#no-hosts# 添加读取额外的 hosts 文件路径，可以多次指定。如果指定为目录，则读取目录中的所有文件。#addn-hosts=/etc/hosts# 读取目录中的所有文件，文件更新将自动读取#hostsdir=&lt;path&gt;# 例如，/etc/hosts中的os01将扩展成os01.example.com#expand-hosts ############################################################################### 缓存时间设置，一般不需要设置# 本地 hosts 文件的缓存时间，通常不要求缓存本地，这样更改hosts文件后就即时生效。#local-ttl=3600# 同 local-ttl 仅影响 DHCP 租约#dhcp-ttl=&lt;time&gt;# 对于上游返回的值没有ttl时，dnsmasq给一个默认的ttl，一般不需要设置，#neg-ttl=&lt;time&gt;# 指定返回给客户端的ttl时间，一般不需要设置#max-ttl=&lt;time&gt;# 设置在缓存中的条目的最大 TTL。#max-cache-ttl=&lt;time&gt;# 不需要设置，除非你知道你在做什么。#min-cache-ttl=&lt;time&gt;# 一般不需要设置#auth-ttl=&lt;time&gt; ############################################################################### 记录dns查询日志#log-queries# 设置日志记录器，‘-‘ 为 stderr，也可以是文件路径。默认为：DAEMON，调试时使用 LOCAL0。#log-facility=&lt;facility&gt;#log-facility=/var/log/dnsmasq/dnsmasq.log# 异步log，缓解阻塞，提高性能。默认为5，最大100。#log-async[=&lt;lines&gt;]#log-async=50 ############################################################################### 指定用户和组#user=nobody#group=nobody ############################################################################### 指定DNS的端口，默认53，设置 port=0 将完全禁用 DNS 功能，仅使用 DHCP/TFTP#port=53# 指定 EDNS.0 UDP 包的最大尺寸，默认为 RFC5625 推荐的 edns-packet-max=4096#edns-packet-max=&lt;size&gt;# 指定向上游查询的 UDP 端口，默认是随机端口，指定后降低安全性、加快速度、减少资源消耗。# 设置为 0 有操作系统分配。query-port=53535# 指定向上游查询的 UDP 端口范围，方便防火墙设置。#min-port=&lt;port&gt;#max-port=&lt;port&gt;# 指定接口，指定后同时附加 lo 接口，可以使用‘*‘通配符#interface=wlp2s0# 指定排除的接口，排除高优先级，可以使用‘*‘通配符#except-interface=# 启用 DNS 验证模式#auth-server=&lt;domain&gt;,&lt;interface&gt;|&lt;ip-address&gt;# 仅接收同一子网的 DNS 请求，仅在未指定 interface、except-interface、listen-address # 或者 auth-server 时有效。#local-service# 指定不提供 DHCP 或 TFTP 服务的接口，仅提供 DNS 服务#no-dhcp-interface=enp3s0# 指定IP地址，可以多次指定。下面两行跟指定接口的作用类似。#listen-address=192.168.10.254#listen-address=127.0.0.1# 绑定接口，开启此项将仅监听指定的接口。#bind-interfaces# 对于新添加的接口也进行绑定。#bind-dynamic ############################################################################### 如果 hosts 中的主机有多个 IP 地址，仅返回对应子网的 IP 地址。#localise-queries# 如果反向查找的是私有地址例如192.168.X.X，仅从 hosts 文件查找，不再转发到上游服务器#bogus-priv# 对于任何被解析到此IP的域名，使其解析失效，可以多次指定#bogus-nxdomain=64.94.110.11# 忽略指定的 DNS 响应服务器地址，例如 1.1.1.1 为伪造的 dns 服务器并且响应速度非常快，# 指定 ignore-address=1.1.1.1 可以忽略它的响应信息，从而等待正确的响应结果。#ignore-address=&lt;ipaddr&gt;#filterwin2k ############################################################################### 指定 resolv-file 文件路径，默认/etc/resolv.conf#resolv-file=/etc/resolv.conf# 不读取 resolv-file 来确定上游服务器#no-resolv# 在编译时需要启用 DBus 支持。#enable-dbus[=&lt;service-name&gt;]# 严格按照resolv.conf中的顺序进行查找#strict-order# 向所有上有服务器发送查询，而不是一个。#all-servers#dns-loop-detect ############################################################################### 这项安全设置是拒绝解析包含私有 IP 地址的域名，# 这些IP地址包括如下私有地址范围：10.0.0.0/8、172.16.0.0/12、192.168.0.0/16。# 其初衷是要防止类似上游DNS服务器故意将某些域名解析成特定私有内网IP而劫持用户这样的安全攻击。# 直接在配置文件中注销 stop-dns-rebind 配置项从而禁用该功能。# 这个方法确实可以一劳永逸的解决解析内网 IP 地址的问题，但是我们也失去了这项安全保护的特性，# 所以在这里我不推荐这个办法。# 使用 rebind-domain-ok 进行特定配置，顾名思义该配置项可以有选择的忽略域名的 rebind 行为#stop-dns-rebind#rebind-localhost-ok#rebind-domain-ok=[&lt;domain&gt;]|[[/&lt;domain&gt;/[&lt;domain&gt;/]#rebind-domain-ok=/.dinghuangjie.com/.dhj.com/.harlinsu.com/.example.com/.test.com/.esderive.com/ ############################################################################### 也不要检测 /etc/resolv.conf 的变化#no-poll# 重启后清空缓存#clear-on-reload# 完整的域名才向上游服务器查找，如果仅仅是主机名仅查找hosts文件#domain-needed ############################################################################### IP地址转换#alias=[&lt;old-ip&gt;]|[&lt;start-ip&gt;-&lt;end-ip&gt;],&lt;new-ip&gt;[,&lt;mask&gt;]###############################################################################local=[/[&lt;domain&gt;]/[domain/]][&lt;ipaddr&gt;[#&lt;port&gt;][@&lt;source-ip&gt;|&lt;interface&gt;[#&lt;port&gt;]]#server=[/[&lt;domain&gt;]/[domain/]][&lt;ipaddr&gt;[#&lt;port&gt;][@&lt;source-ip&gt;|&lt;interface&gt;[#&lt;port&gt;]]#server=/example.com/192.168.10.252#rev-server=&lt;ip-address&gt;/&lt;prefix-len&gt;,&lt;ipaddr&gt;[#&lt;port&gt;][@&lt;source-ip&gt;|&lt;interface&gt;[#&lt;port&gt;]] # 将任何属于 &lt;domain&gt; 域名解析成指定的 &lt;ipaddr&gt; 地址。# 也就是将 &lt;domain&gt; 及其所有子域名解析成指定的 &lt;ipaddr&gt; IPv4 或者 IPv6 地址，# 通常用于屏蔽特定的域名。# 一次只能指定一个 IPv4 或者 IPv6 地址，# 要同时返回 IPv4 和IPv6 地址，请多次指定 address= 选项。# 注意： /etc/hosts 以及 DHCP 租约将覆盖此项设置。#address=/&lt;domain&gt;/[domain/][&lt;ipaddr&gt;] #ipset=/&lt;domain&gt;/[domain/]&lt;ipset&gt;[,&lt;ipset&gt;]#mx-host=&lt;mx name&gt;[[,&lt;hostname&gt;],&lt;preference&gt;]#mx-target=&lt;hostname&gt; # SRV 记录#srv-host=&lt;_service&gt;.&lt;_prot&gt;.[&lt;domain&gt;],[&lt;target&gt;[,&lt;port&gt;[,&lt;priority&gt;[,&lt;weight&gt;]]]] # A, AAAA 和 PTR 记录 #host-record=&lt;name&gt;[,&lt;name&gt;....],[&lt;IPv4-address&gt;],[&lt;IPv6-address&gt;][,&lt;TTL&gt;] # TXT 记录#txt-record=&lt;name&gt;[[,&lt;text&gt;],&lt;text&gt;] # PTR 记录 #ptr-record=&lt;name&gt;[,&lt;target&gt;] #naptr-record=&lt;name&gt;,&lt;order&gt;,&lt;preference&gt;,&lt;flags&gt;,&lt;service&gt;,&lt;regexp&gt;[,&lt;replacement&gt;] # CNAME 别名记录#cname=&lt;cname&gt;,&lt;target&gt;[,&lt;TTL&gt;]  #dns-rr=&lt;name&gt;,&lt;RR-number&gt;,[&lt;hex data&gt;]#interface-name=&lt;name&gt;,&lt;interface&gt;[/4|/6]#synth-domain=&lt;domain&gt;,&lt;address range&gt;[,&lt;prefix&gt;]#add-mac[=base64|text]#add-cpe-id=&lt;string&gt;#add-subnet[[=[&lt;IPv4 address&gt;/]&lt;IPv4 prefix length&gt;][,[&lt;IPv6 address&gt;/]&lt;IPv6 prefix length&gt;]]############################################################################## ############################################################################### 缓存条数，默认为150条，cache-size=0 禁用缓存。cache-size=1000# 不缓存未知域名缓存，默认情况下dnsmasq缓存未知域名并直接返回为客户端。#no-negcache# 指定DNS同属查询转发数量dns-forward-max=1000 # 启用连接跟踪，读取 Linux 入栈 DNS 查询请求的连接跟踪标记，# 并且将上游返回的响应信息设置同样的标记。# 用于带宽控制和防火墙部署。# 此选项必须在编译时启用 conntrack 支持，并且内核正确配置并加载 conntrack。# 此选项不能与 query-port 同时使用。#conntrack  ################################################################################        DHCP 选项################################################################################ 设置 DHCP 地址池，同时启用 DHCP 功能。# IPv4 &lt;mode&gt; 可指定为 static|proxy ，当 &lt;mode&gt; 指定为 static 时，# 需用 dhcp-host 手动分配地址池中的 IP 地址。# 当 &lt;mode&gt; 指定为 proxy 时，为指定的地址池提供 DHCP 代理。#dhcp-range=[tag:&lt;tag&gt;[,tag:&lt;tag&gt;],][set:&lt;tag&gt;,]&lt;start-addr&gt;[,&lt;end-addr&gt;][,&lt;mode&gt;][,&lt;netmask&gt;[,&lt;broadcast&gt;]][,&lt;lease time&gt;]#dhcp-range=172.16.0.2,172.16.0.250,255.255.255.0,1h#dhcp-range=192.168.10.150,192.168.10.180,static,255.255.255.0,1h # 根据 MAC 地址或 id 固定分配客户端的 IP 地址、主机名、租期。# IPv4 下指定 id:* 将忽略 DHCP 客户端的 ID ，仅根据 MAC 来进行 IP 地址分配。# 在读取 /etc/hosts 的情况，也可以根据 /etc/hosts 中的主机名分配对应 IP 地址。# 指定 ignore 将忽略指定客户端得 DHCP 请求。#dhcp-host=[&lt;hwaddr&gt;][,id:&lt;client_id&gt;|*][,set:&lt;tag&gt;][,&lt;ipaddr&gt;][,&lt;hostname&gt;][,&lt;lease_time&gt;][,ignore]#dhcp-hostsfile=&lt;path&gt;#dhcp-hostsdir=&lt;path&gt;# 读取 /etc/ethers 文件 与使用 dhcp-host 的作用相同。IPv6 无效。#read-ethers # 指定给 DHCP 客户端的选项信息，# 默认情况下 dnsmasq 将发送：子网掩码、广播地址、DNS 服务器地址、网关地址、域等信息。# 指定此选项也可覆盖这些默认值并且设置其他选项值。# 重要：可以使用 option:&lt;option-name&gt;或者 option号 来指定。# &lt;option-name&gt; 和 option号的对应关系可使用命令：# dnsmasq --help dhcp 以及 dnsmasq --help dhcp6 查看，这点很重要。# 例如设置网关参数，既可以使用 dhcp-option=3,192.168.4.4 也可以使用 dhcp-option = option:router,192.168.4.4。# 0.0.0.0 意味着当前运行 dnsmasq 的主机地址。# 如果指定了多个 tag:&lt;tag&gt; 必须同时匹配才行。# [encap:&lt;opt&gt;,][vi-encap:&lt;enterprise&gt;,][vendor:[&lt;vendor-class&gt;],] 有待继续研究。#dhcp-option=[tag:&lt;tag&gt;,[tag:&lt;tag&gt;,]][encap:&lt;opt&gt;,][vi-encap:&lt;enterprise&gt;,][vendor:[&lt;vendor-class&gt;],][&lt;opt&gt;|option:&lt;opt-name&gt;|option6:&lt;opt&gt;|option6:&lt;opt-name&gt;],[&lt;value&gt;[,&lt;value&gt;]]#dhcp-option-force=[tag:&lt;tag&gt;,[tag:&lt;tag&gt;,]][encap:&lt;opt&gt;,][vi-encap:&lt;enterprise&gt;,][vendor:[&lt;vendor-class&gt;],]&lt;opt&gt;,[&lt;value&gt;[,&lt;value&gt;]]#dhcp-optsfile=&lt;path&gt;#dhcp-optsdir=&lt;path&gt;#dhcp-option=3,1.2.3.4#dhcp-option=option:router,1.2.3.4#dhcp-option=option:router,192.168.10.254#dhcp-option=option:dns-server,192.168.10.254,221.12.1.227,221.12.33.227 ############################################################################### (IPv4 only) 禁用重用服务器名称和文件字段作为额外的 dhcp-option 选项。# 一般情况下 dnsmasq 从 dhcp-boot 移出启动服务器和文件信息到 dhcp-option 选项中。# 这使得在 dhcp-option 选项封包中有额外的选项空间可用，但是会使老的客户端混淆。# 此选项将强制使用简单并安全的方式来避免此类情况。可以认为是一个兼容性选项。#dhcp-no-override ############################################################################### 配置 DHCP 中继。# &lt;local address&gt; 是运行 dnsmasq 的接口的 IP 地址。# 所有在 &lt;local address&gt; 接口上接收到的 DHCP 请求将中继到 &lt;server address&gt; 指定的远程 DHCP 服务器。# 可以多次配置此选项，使用同一个 &lt;local address&gt; 转发到多个不同的 &lt;server address&gt; 指定的远程 DHCP 服务器。# &lt;server address&gt; 仅允许使用 IP 地址，不能使用域名等其他格式。# 如果是 DHCPv6，&lt;server address&gt; 可以是 ALL_SERVERS 的多播地址 ff05::1:3 。# 在这种情况下必须指定接口 &lt;interface&gt; ，不能使用通配符，用于直接多播到对应的 DHCP 服务器所在的接口。# &lt;interface&gt; 指定了仅允许接收从 &lt;interface&gt; 接口的 DHCP 服务器相应信息。#dhcp-relay=&lt;local address&gt;,&lt;server address&gt;[,&lt;interface&gt;] ############################################################################### 设置标签#dhcp-vendorclass=set:&lt;tag&gt;,[enterprise:&lt;IANA-enterprise number&gt;,]&lt;vendor-class&gt;#dhcp-userclass=set:&lt;tag&gt;,&lt;user-class&gt;#dhcp-mac=set:&lt;tag&gt;,&lt;MAC address&gt;#dhcp-circuitid=set:&lt;tag&gt;,&lt;circuit-id&gt;#dhcp-remoteid=set:&lt;tag&gt;,&lt;remote-id&gt;#dhcp-subscrid=set:&lt;tag&gt;,&lt;subscriber-id&gt;#dhcp-match=set:&lt;tag&gt;,&lt;option number&gt;|option:&lt;option name&gt;|vi-encap:&lt;enterprise&gt;[,&lt;value&gt;]#tag-if=set:&lt;tag&gt;[,set:&lt;tag&gt;[,tag:&lt;tag&gt;[,tag:&lt;tag&gt;]]] #dhcp-proxy[=&lt;ip addr&gt;]...... ############################################################################### 不分配匹配这些 tag:&lt;tag&gt; 的 DHCP 请求。#dhcp-ignore=tag:&lt;tag&gt;[,tag:&lt;tag&gt;]#dhcp-ignore-names[=tag:&lt;tag&gt;[,tag:&lt;tag&gt;]]#dhcp-generate-names=tag:&lt;tag&gt;[,tag:&lt;tag&gt;]# IPv4 only 使用广播与匹配 tag:&lt;tag&gt; 的客户端通信。一般用于兼容老的 BOOT 客户端。#dhcp-broadcast[=tag:&lt;tag&gt;[,tag:&lt;tag&gt;]]  ############################################################################### IPv4 only 设置 DHCP 服务器返回的 BOOTP 选项，# &lt;servername&gt; &lt;server address&gt; 可选，# 如果未设置服务器名称将设为空，服务器地址设为 dnsmasq 的 IP 地址。# 如果指定了多个 tag:&lt;tag&gt; 必须同时匹配才行。# 如果指定 &lt;tftp_servername&gt; 将按照 /etc/hosts 中对应的 IP 地址进行轮询负载均衡。  #dhcp-boot=[tag:&lt;tag&gt;,]&lt;filename&gt;,[&lt;servername&gt;[,&lt;server address&gt;|&lt;tftp_servername&gt;]]# 根据不同的类型使用不同的选项。# 使用示例：#        dhcp-match=set:EFI_x86-64,option:client-arch,9#        dhcp-boot=tag:EFI_x86-64,uefi/grubx64.efi#        #dhcp-match=set:EFI_Xscale,option:client-arch,8#        #dhcp-boot=tag:EFI_Xscale,uefi/grubx64.efi#        #dhcp-match=set:EFI_BC,option:client-arch,7#        #dhcp-boot=tag:EFI_BC,uefi/grubx64.efi#        #dhcp-match=set:EFI_IA32,option:client-arch,6#        #dhcp-boot=tag:EFI_IA32,uefi/grubx64.efi#        #dhcp-match=set:Intel_Lean_Client,option:client-arch,5#        #dhcp-boot=tag:Intel_Lean_Client,uefi/grubx64.efi#        #dhcp-match=set:Arc_x86,option:client-arch,4#        #dhcp-boot=tag:Arc_x86,uefi/grubx64.efi#        #dhcp-match=set:DEC_Alpha,option:client-arch,3#        #dhcp-boot=tag:DEC_Alpha,uefi/grubx64.efi#        #dhcp-match=set:EFI_Itanium,option:client-arch,2#        #dhcp-boot=tag:EFI_Itanium,uefi/grubx64.efi#        #dhcp-match=set:NEC/PC98,option:client-arch,1#        #dhcp-boot=tag:NEC/PC98,uefi/grubx64.efi#        dhcp-match=set:Intel_x86PC,option:client-arch,0#        dhcp-boot=tag:Intel_x86PC,pxelinux.0 ############################################################################### DHCP 使用客户端的 MAC 地址的哈希值为客户端分配 IP 地址，# 通常情况下即使客户端使自己的租约到期，客户端的 IP 地址仍将长期保持稳定。# 在默认模式下，IP 地址是随机分配的。# 启用 dhcp-sequential-ip 选项将按顺序分配 IP 地址。# 在顺序分配模式下，客户端使租约到期更像是仅仅移动一下 IP 地址。# 在通常情况下不建议使用这种方式。#dhcp-sequential-ip ############################################################################### 多数情况下我们使用 PXE，只是简单的允许 PXE 客户端获取 IP 地址，# 然后 PXE 客户端下载 dhcp-boot 选项指定的文件并执行，也就是 BOOTP 的方式。# 然而在有适当配置的 DHCP 服务器支持的情况下，PXE 系统能够实现更复杂的功能。# pxe-service 选项可指定 PXE 环境的启动菜单。# 为不同的类型系统设定不同的启动菜单，并且覆盖 dhcp-boot 选项。# &lt;CSA&gt; 为客户端系统类型：x86PC, PC98, IA64_EFI, Alpha, Arc_x86, Intel_Lean_Client, # IA32_EFI, X86-64_EFI, Xscale_EFI, BC_EFI, ARM32_EFI 和 ARM64_EFI，其他类型可能为一个整数。# &lt;basename&gt; 引导 PXE 客户端使用 tftp 从 &lt;server address&gt; 或者 &lt;server_name&gt; 下载文件。#     注意："layer" 后缀 (通常是 ".0") 由 PXE 提供，也就是 PXE 客户端默认在文件名附加 .0 后缀。#     示例：pxe-service=x86PC, "Install Linux", pxelinux         （读取 pxelinux.0 文件并执行）#           pxe-service=x86PC, "Install Linux", pxelinux, 1.2.3.4（不适用于老的PXE）#     &lt;bootservicetype&gt; 整数，PXE 客户端将通过广播或者通过 &lt;server address&gt; #           或者 &lt;server_name&gt; 搜索对应类型的适合的启动服务。。#     示例：pxe-service=x86PC, "Install windows from RIS server", 1#           pxe-service=x86PC, "Install windows from RIS server", 1, 1.2.3.4#     未指定 &lt;basename&gt;、&lt;bootservicetype&gt; 或者 &lt;bootservicetype&gt; 为 “0”，将从本地启动。#     示例：pxe-service=x86PC, "Boot from local disk"#           pxe-service=x86PC, "Boot from local disk", 0# 如果指定 &lt;server_name&gt; 将按照 /etc/hosts 中对应的 IP 地址进行轮询负载均衡。  #pxe-service=[tag:&lt;tag&gt;,]&lt;CSA&gt;,&lt;menu text&gt;[,&lt;basename&gt;|&lt;bootservicetype&gt;][,&lt;server address&gt;|&lt;server_name&gt;]# 在 PXE 启动后弹出提示，&lt;prompt&gt; 为提示内容，&lt;timeout&gt; 为超时时间，为 0 则立即执行。# 如果未指定此选项，在有多个启动选项的情况下等待用户选择，不会超时。#pxe-prompt=[tag:&lt;tag&gt;,]&lt;prompt&gt;[,&lt;timeout&gt;]# 根据不同的类型使用不同的菜单，使用示例：#        #pxe-prompt="What system shall I netboot?", 120#        # or with timeout before first available action is taken:#        pxe-prompt="Press F8 or Enter key for menu.", 60#        pxe-service=x86PC, "Now in x86PC (BIOS mode), boot from local", 0#        pxe-service=x86PC, "Now in x86PC (BIOS mode)", pxelinux#        pxe-service=PC98, "Now in PC98 mode", PC98#        pxe-service=IA64_EFI, "Now in IA64_EFI mode", IA64_EFI#        pxe-service=Alpha, "Now in Alpha mode", Alpha#        pxe-service=Arc_x86, "Now in Arc_x86 mode", Arc_x86#        pxe-service=Intel_Lean_Client, "Now in Intel_Lean_Client mode", Intel_Lean_Client#        pxe-service=IA32_EFI, "Now in IA32_EFI mode", IA32_EFI#        pxe-service=X86-64_EFI, "Now in X86-64_EFI (UEFI mode), boot from local", 0#        pxe-service=X86-64_EFI, "Now in X86-64_EFI (UEFI mode)", grub/grub-x86_64.efi#        pxe-service=Xscale_EFI, "Now in Xscale_EFI mode", Xscale_EFI#        pxe-service=BC_EFI, "Now in BC_EFI mode", BC_EFI#        # CentOS7 系统不支持下列两个选项#        #pxe-service=ARM32_EFI,"Now in ARM32_EFI mode",ARM32_EFI#        #pxe-service=ARM64_EFI,"Now in ARM64_EFI mode",ARM64_EFI ############################################################################### 默认为150，即最多分配150个ip地址出去，最大1000个ip#dhcp-lease-max=150# (IPv4 only) 指定DHCP端口，默认为67和68。如果不指定则为1067和1068，单指定一个，第二个加1#dhcp-alternate-port[=&lt;server port&gt;[,&lt;client port&gt;]]# 谨慎使用此选项，避免 IP 地址浪费。(IPv4 only) 允许动态分配 IP 地址给 BOOTP 客户端。# 注意：BOOTP 客户端获取的 IP 地址是永久的，将无法再次分配给其他客户端。#bootp-dynamic[=&lt;network-id&gt;[,&lt;network-id&gt;]]# 谨慎使用此选项。# 默认情况下 DHCP 服务器使用 ping 的方式进行确保 IP 未被使用的情况下将 IP 地址分配出去。# 启用此选项将不使用 ping 进行确认。#no-ping ############################################################################### 记录额外的 dhcp 日志，记录所有发送给 DHCP 客户端的选项（option）以及标签（tag）信息#log-dhcp# 禁止记录日常操作日志，错误日志仍然记录。启用 log-dhcp 将覆盖下列选项。#quiet-dhcp#quiet-dhcp6#quiet-ra # 修改 DHCP 默认租约文件路径，默认情况下无需修改#dhcp-leasefile=/var/lib/dnsmasq/dnsmasq.leases# (IPv6 only)#dhcp-duid=&lt;enterprise-id&gt;,&lt;uid&gt; ###############################################################################dhcp-script=&lt;path&gt;#dhcp-luascript=&lt;path&gt;#dhcp-scriptuser=root#script-arp#leasefile-ro #bridge-interface=&lt;interface&gt;,&lt;alias&gt;[,&lt;alias&gt;] ############################################################################### 给 DHCP 服务器指定 domain 域名信息，也可以给对应的 IP 地址池指定域名。#     直接指定域名#     示例：domain=thekelleys.org.uk#     子网对应的域名#     示例：domain=wireless.thekelleys.org.uk,192.168.2.0/24#     ip范围对应的域名#     示例：domain=reserved.thekelleys.org.uk,192.68.3.100,192.168.3.200#domain=&lt;domain&gt;[,&lt;address range&gt;[,local]]# 在默认情况下 dnsmasq 插入普通的客户端主机名到 DNS 中。# 在这种情况下主机名必须唯一，即使两个客户端具有不同的域名后缀。# 如果第二个客户端使用了相同的主机名，DNS 查询将自动更新为第二个客户端的 IP 地址。# 如果设置了 dhcp-fqdn 选项，普通的主机名将不再插入到 DNS 中去，# 仅允许合格的具有域名后缀的主机名插入到 DNS 服务器中。# 指定此选项需同时指定不含 &lt;address range&gt; 地址范围的 domain 选项。#dhcp-fqdn# 通常情况下分配 DHCP 租约后，dnsmasq 设置 FQDN 选项告诉客户端不要尝试 DDNS 更新主机名与 IP 地址。# 这是因为  name-IP 已自动添加到 dnsmasq 的 DNS 视图中的。# 设置此选项将允许客户端 DDNS 更新，# 在 windows 下允许客户端更新 windows AD 服务器是非常有用的。# 参看  RFC 4702 。#dhcp-client-update #enable-ra#ra-param=&lt;interface&gt;,[high|low],[[&lt;ra-interval&gt;],&lt;router lifetime&gt;]  ################################################################################        TFTP 选项################################################################################ 对于绝大多数的配置，仅需指定 enable-tftp 和 tftp-root 选项即可。# 是否启用内置的 tftp 服务器，可以指定多个逗号分隔的网络接口#enable-tftp[=&lt;interface&gt;[,&lt;interface&gt;]]#enable-tftp#enable-tftp=enp3s0,lo# 指定 tftp 的根目录，也就是寻找传输文件时使用的相对路径，可以附加接口，#tftp-root=&lt;directory&gt;[,&lt;interface&gt;]#tftp-root=/var/lib/tftpboot/# 如果取消注释，那么即使指定的 tftp-root 无法访问，仍然启动 tftp 服务。#tftp-no-fail# 附加客户端的 IP 地址作为文件路径。此选项仅在正确设置了 tftp-root 的情况下可用，# 示例：如果 tftp-root=/tftp，客户端为 192.168.1.15 请求 myfile.txt 文件时，# 将优先请求 /tftp/192.168.1.15/myfile.txt 文件， 其次是 /tftp/myfile.txt 文件。# 感觉没什么用。#tftp-unique-root# 启用安全模式，启用此选项，仅允许 tftp 进程访问属主为自己的文件。# 不启用此选项，允许访问所有 tftp 进程属主可读取的文件。# 如果 dnsmasq 是以 root 用户运行，tftp-secure 选项将允许访问全局可读的文件。# 一般情况下不推荐以 root 用户运行 dnsmasq。# 在指定了 tftp-root 的情况下并不是很重要。#tftp-secure# 将所有文件请求转换为小写。对于 Windows 客户端来说非常有用，建议开启此项。# 注意：dnsmasq 的 TFTP 服务器总是将文件路径中的“\”转换为“/”。#tftp-lowercase# 允许最大的连接数，默认为 50 。# 如果将连接数设置的很大，需注意每个进程的最大文件描述符限制，详见文档手册。#tftp-max=&lt;connections&gt;#tftp-max=50# 设置传输时的 MTU 值，建议不设置或按需设置。# 如果设定的值大于网络接口的 MTU 值，将按照网络接口的 MTU 值自动分片传输（不推荐）。#tftp-mtu=&lt;mtu size&gt;# 停止 tftp 服务器与客户端协商 "blocksize" 选项。启用后，防止一些古怪的客户端出问题。#tftp-no-blocksize# 指定 tftp 的连接端口的范围，方便防火墙部署。# tftp 侦听在 69/udp ，连接端口默认是由系统自动分配的，# 非 root 用户运行时指定的连接端口号需大于 1025 最大 65535。#tftp-port-range=&lt;start&gt;,&lt;end&gt;################################################################################conf-dir=&lt;directory&gt;[,&lt;file-extension&gt;......]#conf-file=/etc/dnsmasq.more.confconf-dir=/etc/dnsmasq.d#servers-file=&lt;file&gt;</code></pre><p>&nbsp;</p>]]>
                        
                    </content>
                </entry>
            
                <entry>
                    <title><![CDATA[Mac OS 最好用的鼠标手势软件 MacStroke]]></title>
                    <link rel="alternate" type="text/html"
                          href="/archives/MacOS最好用的鼠标手势软件MacStroke"/>
                    <id>tag:http://mtjo.net,2019-12-18:MacOS最好用的鼠标手势软件MacStroke</id>
                    <published>2019-12-18T10:08:38+08:00</published>
                    <updated>2021-10-20T23:50:37+08:00</updated>
                    <author>
                        <name>MTJO</name>
                        <uri>http://mtjo.net</uri>
                    </author>
                    <content type="html">
                        
                            <![CDATA[<p>本人早期程序猿，重度依赖鼠标,多年前linux 下用上easystorke一发不可收拾，自入手了Mac mini 用了一陈子总觉得少了什么。。。无可否认，MAC的触控板很好用，MAC系统的键盘快捷键很方便，但MAC的软件，特别是Safari缺少鼠标手势实在是有点遗憾，而且不是所以人都用 macbook或者买触摸板。作为程序猿实在忍不了，于是着手开发Mac下的手势软件 MacStroke<br />&nbsp;</p><p><img src="//oss.mtjo.net/img/mtjo/4cc3fd48f8bd05ac0ed8c51163f93f56.png" /></p><p>有了它的帮助，你可以做到：<br />一只手拿着PIzza吃，一只手握着鼠标就可以方便地上网冲浪，不用担心弄脏键盘了，当然有些人会说键盘快捷键+触控板也可以啊，但在选择前者你会觉得更Cool，更节省时间，而且准备率更高，用过360浏览器的鼠标手势就明白了。</p><p>&nbsp;</p><h3>介绍一下软件的功能：<br />1.这个软件是系统级的，在任何一个运行的软件上都可以用手势，不只针对浏览器，我觉得这是它最大的优点，其它的就不说了，鼠标手势的快捷方便用过的都知道。</h3><p><img src="//oss.mtjo.net/img/mtjo/cc240222241cd0a63933993851b35145.png" /></p><h3>2. 预设了常用的手势，安装就能用，不用辛苦一个个录用<br />&nbsp;</h3><p><img src="//oss.mtjo.net/img/mtjo/dcf42ca3cfc3f1bdcfe3b2208b96800f.png" /></p><h3>3 .支持 热键/文本/密码/applescript 等操作</h3><p><img src="//oss.mtjo.net/img/mtjo/01f8d1fd63158a93e9f08ac0206ce3a8.png" /></p><h3>4. 内置标准 数字字母手势 不用担心自己手画的线不直</h3><p><img src="//oss.mtjo.net/img/mtjo/96bf982875421ef1848c11e7b272daf0.png" /></p><p>&nbsp;</p><p><img alt="[IMG]" src="//oss.mtjo.net/img/mtjo/f45950eef3666d1cabfb1263a417d1ac.jpg" /></p><h3>5 集成了开发人员常用右键菜单</h3><p><img src="//oss.mtjo.net/img/mtjo/ade82909b8ea42120f544f757362e087.png" /></p><p><img src="//oss.mtjo.net/img/mtjo/5101bf178da1f2aead826b5f33b9cfb3.png" /></p><h3>6. 还有最近加上的历史粘贴板功能</h3><p><img src="//oss.mtjo.net/img/mtjo/cfdda53957f57aa48bfd338a1ece5447.png" /></p><p><img src="//oss.mtjo.net/img/mtjo/8eb84bb703fafd2c4b976cd8ab347f27.png" /></p><p>&nbsp;</p><h3>最后奉上安装方法&nbsp;</h3><p>1.homebrew 安装</p><pre><code class="language-bash">brew install --cask macstroke</code></pre><p>2.github下载 后拖到 /Applications 目录</p><p>下载地址： <a href="https://github.com/mtjo/MacStroke/releases">https://github.com/mtjo/MacStroke/releases</a></p><p>更多介绍和软件问题请在github上查看或反馈</p>]]>
                        
                    </content>
                </entry>
            
                <entry>
                    <title><![CDATA[frp内网穿透带web 管理 docker 镜像]]></title>
                    <link rel="alternate" type="text/html"
                          href="/archives/frp内网穿透带web管理docker镜像"/>
                    <id>tag:http://mtjo.net,2019-11-30:frp内网穿透带web管理docker镜像</id>
                    <published>2019-11-30T16:00:29+08:00</published>
                    <updated>2021-10-20T23:50:08+08:00</updated>
                    <author>
                        <name>MTJO</name>
                        <uri>http://mtjo.net</uri>
                    </author>
                    <content type="html">
                        
                            <![CDATA[<p>启动服务端 frps</p><pre><code class="language-bash">docker run -itd -p 8080:8080 \-p 7500:7500 \-p 7100:7100/udp \-e "HTTP_USER=admin" \-e "HTTP_PASS=admin" \--restart=always \--name frps \mtjo/frp:frps-v0.30.0</code></pre><p>frps 容器内配置文件可以通过 -v /opt/frp/frps_full.ini:/etc/frps_full.ini 可以挂载到本地实现持久化</p><p>&nbsp;</p><p>通过你的 ip:8080管理服务端配置&nbsp;<code><a href="http://xxx.xxx.xxx.xxx:8080/">http://XXX.XXX.XXX.XXX:8080</a></code></p><p><img alt="image.png" src="//oss.mtjo.net/img/mtjo/5664b98682e90a2d6284ec8e81968f1a.png" title="image.png" /></p><p>在本地启动frpc客户端</p><pre><code class="language-bash">docker run -itd -p 8080:8080 \-e "HTTP_USER=admin" \-e "HTTP_PASS=admin" \--restart=always \ --name frpc \mtjo/frp:frpc-v0.30.0</code></pre><p>frpc 容器内配置文件可以通过 -v /opt/frp/frpc.ini:/etc/frpc.ini 可以挂载到本地实现持久化</p><p>通过你的localhost:8080管理客户端配置&nbsp;<code><a href="http://127.0.0.1:8080/">http://127.0.0.1:8080</a></code></p><p><img alt="image.png" src="//oss.mtjo.net/img/mtjo/91bc08b59cb7557203bec80f6f2bede4.png" title="image.png" /></p>]]>
                        
                    </content>
                </entry>
            
                <entry>
                    <title><![CDATA[Git Pull 避免用户名和密码方法]]></title>
                    <link rel="alternate" type="text/html"
                          href="/archives/GitPull避免用户名和密码方法"/>
                    <id>tag:http://mtjo.net,2019-09-24:GitPull避免用户名和密码方法</id>
                    <published>2019-09-24T03:31:45+08:00</published>
                    <updated>2021-10-20T23:49:26+08:00</updated>
                    <author>
                        <name>MTJO</name>
                        <uri>http://mtjo.net</uri>
                    </author>
                    <content type="html">
                        
                            <![CDATA[<h1 style="margin-left:0; margin-right:0"><img src="//oss.mtjo.net/img/mtjo/19bb1b89d5d2f3c5ab1593201137143b.png" style="height:315px; width:728px" /></h1><h1 style="margin-left:0; margin-right:0"><a href="https://www.cnblogs.com/wangshuo1/p/5531200.html">Git Pull 避免用户名和密码方法</a></h1><p style="margin-right:10px">　　在开发中使用的版本控制器时git , 每次使用命令&quot;git pull&quot;从服务器获得最新代码时，都需要输入用户名和密码，这样浪费了大量的时间和热情，在此背景下，本文在网上找到解决版本，在此做一个总结，已做留念。</p><h2 style="font-style:italic">1. 创建 Git 存储用户名和密码</h2><p style="margin-right:10px"><big>windows</big>:&nbsp; 在%HOME%目录中，一般是 c:/users/{当前用户名} 目录下。文件名为.git-credentials,由于在Window中不允许直接创建以&quot;.&quot;开头的文件，所以需要借助git bash进行，打开git bash客户端，进入%HOME%目录，输入以下内容：</p><pre><code class="language-bash">touch .git-credentialsecho "  https://{username}:{password}@github.com" &gt;.git-credentials</code></pre><p style="margin-right:10px"><big>linux:&nbsp;</big>&nbsp;在~/下， touch创建文件 .git-credentials, 用vim编辑此文件，输入：</p><pre><code class="language-bash">touch .git-credentialsecho "  https://{username}:{password}@github.com" &gt;.git-credentials</code></pre><h2 style="font-style:italic">2. 添加 Git Config内容</h2><p style="margin-right:10px">进入git bash终端， 输入如下命令：</p><pre><code class="language-bash">git config --global credential.helper store</code></pre><p style="margin-right:10px">执行完后查看%HOME%目录下的.gitconfig文件，会多了一项。</p><pre><code class="language-ini">[credential]helper = store</code></pre><p style="margin-right:10px">重新开启git bash会发现git push时不用再输入用户名和密码。</p><p style="margin-right:10px">&nbsp; 注意：</p><p style="margin-right:10px">&nbsp;&nbsp; 如果不能提交代码到git服务器，需要将帐号绑定到git工具上。若不绑定，当你执行git commit &nbsp;是报如下错误。</p><pre><code class="language-bash">*** Please tell me who you are. Rungit config --global user.email "you@example.com" git config --global user.name "Your Name" to set your account's default identity. Omit --global to set the identity only in this repository.</code></pre><p>需要执行 git config --global 命令，全局配置用户的姓名和邮箱，就可以提交git 代码了。</p><pre><code class="language-bash">git config  --global user.email {用户邮箱}git config --global user.name {用户账号}</code></pre><p>&nbsp;</p>]]>
                        
                    </content>
                </entry>
            
                <entry>
                    <title><![CDATA[git 找回丢失的commit]]></title>
                    <link rel="alternate" type="text/html"
                          href="/archives/git找回丢失的commit"/>
                    <id>tag:http://mtjo.net,2019-09-24:git找回丢失的commit</id>
                    <published>2019-09-24T03:17:14+08:00</published>
                    <updated>2021-10-20T23:46:47+08:00</updated>
                    <author>
                        <name>MTJO</name>
                        <uri>http://mtjo.net</uri>
                    </author>
                    <content type="html">
                        
                            <![CDATA[<p><img alt="" src="//oss.mtjo.net/img/mtjo/85f74f0fee87bbdb4d9e0543fd39d739.png" style="height:329px; width:359px" /></p><p>今天是rebase变基时不小心把提交弄没了使用git reflog找回了。<br />具体方法:</p><ul><li>使用git reflog列出最近的操作。</li><li>使用 git checkout [commitid] 切换到节点，之后怎么处理都可以。</li></ul><p><big>方法一</big> :&nbsp; 推荐git cherry-pick [commitid]</p><p>首先切换到要提交的分支 如dev</p><pre><code class="language-bash">git checkout devgit cherry-pick [commitid] #就可以了</code></pre><p><big>方法二 :</big></p><pre><code class="language-bash">git checkout [commitid] #把修改的代码拷贝出来</code></pre><p>拉出最新代码再复制回去，提交搞定。</p><p>主要问题时变基时报出一个错误，然后没理会有继续变基，下次遇到错误应该先保存一下代码。不然就找不回来就惨了。还好git这方面有解决方法。</p><p>&nbsp;</p>]]>
                        
                    </content>
                </entry>
            
                <entry>
                    <title><![CDATA[navicat 连接数据库自动断开连接解决办法]]></title>
                    <link rel="alternate" type="text/html"
                          href="/archives/navicat连接数据库自动断开连接解决办法"/>
                    <id>tag:http://mtjo.net,2019-01-05:navicat连接数据库自动断开连接解决办法</id>
                    <published>2019-01-05T15:01:45+08:00</published>
                    <updated>2019-01-05T15:05:32+08:00</updated>
                    <author>
                        <name>MTJO</name>
                        <uri>http://mtjo.net</uri>
                    </author>
                    <content type="html">
                        
                            <![CDATA[<p>navicat 连接数据库自动断开连接解决办法</p><p>这是因为数据库服务器设置了连接多久没有活动就自动断开，避免连接数过多。</p><p>解决办法：</p><p>在连接上右键--&gt;编辑连接--&gt;</p><p>打开连接属性，选择Advanced（高级），设置Keepalive Interval(120) -- 每2分钟自动发送一次心跳数据，这样就可以一直保持连接不断开了。</p><p>&nbsp;</p><p>&nbsp;</p><p><img src="//oss.mtjo.net/img/mtjo/599b0b636d133062432501cc7f3d2ea6.png" style="height:681px; width:726px" /></p><p>&nbsp;</p><p><img src="//oss.mtjo.net/img/mtjo/808f1d035d023273e50208f23f33c727.png" style="height:662px; width:720px" /></p>]]>
                        
                    </content>
                </entry>
            
                <entry>
                    <title><![CDATA[ssh 与远程机器保持心跳（linux）]]></title>
                    <link rel="alternate" type="text/html"
                          href="/archives/ssh与远程机器保持心跳linux"/>
                    <id>tag:http://mtjo.net,2019-01-04:ssh与远程机器保持心跳linux</id>
                    <published>2019-01-04T11:11:01+08:00</published>
                    <updated>2021-10-20T23:43:40+08:00</updated>
                    <author>
                        <name>MTJO</name>
                        <uri>http://mtjo.net</uri>
                    </author>
                    <content type="html">
                        
                            <![CDATA[<p style="text-align:center"><img alt="image.png" src="//oss.mtjo.net/img/mtjo/ae84cb9a1ed36c7eee9afa832e596a40.png" /></p><h1 style="margin-left:0; margin-right:0">解决SSH自动断线问题</h1><h1 style="margin-left:0; margin-right:0"><span style="font-family:&quot;Courier New&quot;; font-size:18px">在连接远程SSH服务的时候，经常会发生长时间后的断线，或者无响应（无法再键盘输入）。<br />总体来说有两个方法：</span></h1><p style="margin-left:0; margin-right:0"><span style="font-family:&quot;Courier New&quot;; font-size:18px">一、客户端定时发送心跳<br />1.putty、SecureCRT、XShell都有这个功能，设置请自行搜索</span></p><p>2.此外在Linux下：</p><pre><code class="language-bash">#修改本机/etc/ssh/ssh_configvim /etc/ssh/ssh_config</code></pre><p># 添加</p><pre><code class="language-bash">ServerAliveInterval 30ServerAliveCountMax 100</code></pre><p>即每隔30秒，向服务器发出一次心跳。若超过100次请求，都没有发送成功，则会主动断开与服务器端的连接。</p><p>&nbsp;</p><p><span style="font-size:18px">二、服务器端定时向客户端发送心跳（一劳永逸）</span></p><p># 修改服务器端 ssh配置&nbsp;/etc/ssh/sshd_config</p><pre><code class="language-bash">vim /etc/ssh/sshd_config</code></pre><p># 添加</p><pre><code class="language-bash">ClientAliveInterval 30ClientAliveCountMax 6</code></pre><p>ClientAliveInterval表示每隔多少秒，服务器端向客户端发送心跳，是的，你没看错。</p><p>下面的ClientAliveInterval表示上述多少次心跳无响应之后，会认为Client已经断开。</p><p>所以，总共允许无响应的时间是60*3=180秒。</p>]]>
                        
                    </content>
                </entry>
            
        
    </feed>
